In my ten years of professional bike fitting and wrenching, I’ve seen thousands of riders drop serious cash on carbon wheels and electronic drivetrains, only to ignore the single most critical component dictating their comfort and handling. I am talking, of course, about the road bicycle stem. It is the literal bridge between your body and your machine’s steering column.
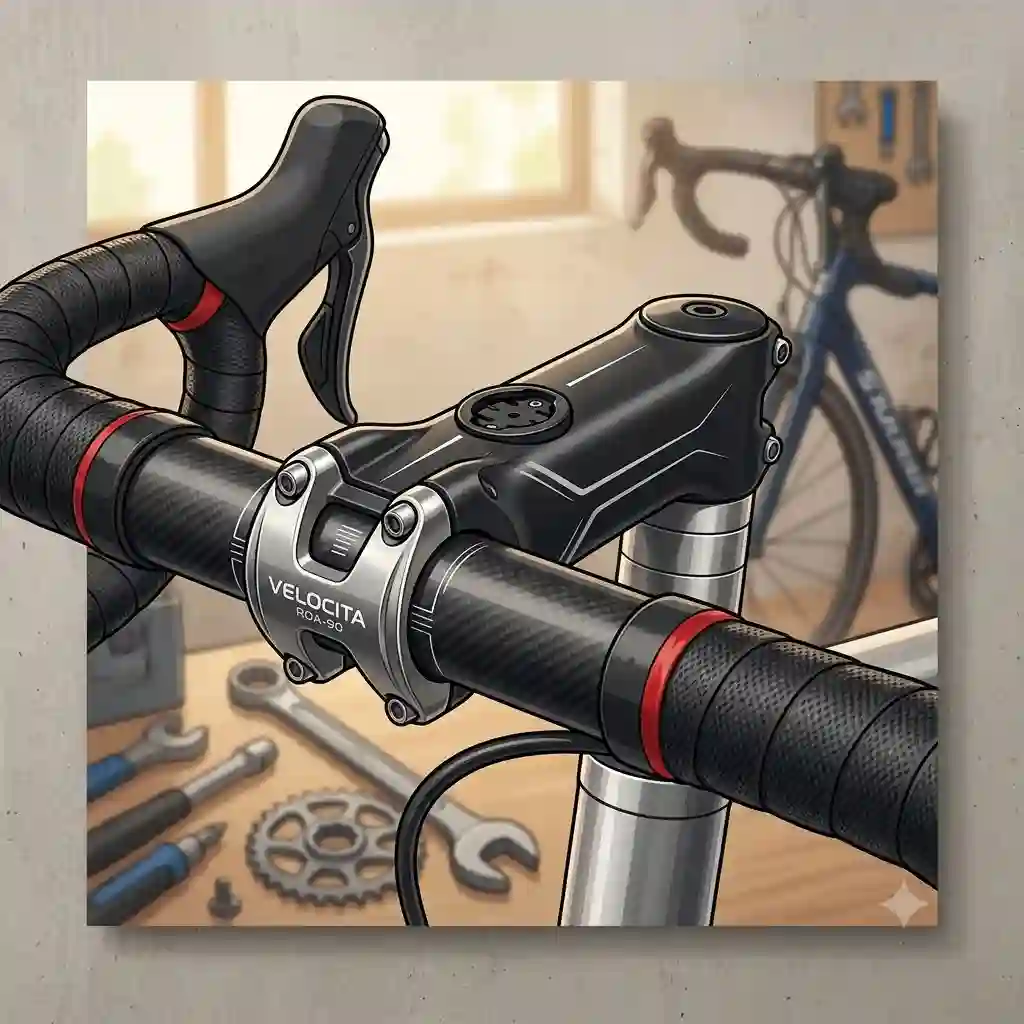
When clients come to me complaining of numb hands, lower back pain, or a bike that feels “nervous” on fast descents, they usually blame the frame geometry or their gloves. In reality, a swap of just 10 millimeters in length or a 6-degree change in angle can completely rewrite your relationship with your bike. What is a road bicycle stem? Simply put, it’s the cylindrical aluminum or carbon clamp that connects your fork’s steerer tube to your handlebars. But biomechanically, it’s the master dial for your reach, drop, and steering leverage.
The industry has shifted significantly entering 2026. With the rise of fully integrated cable routing and aerodynamic profiles, selecting the right component is no longer just about picking a length. You have to consider stack height, faceplate rigidity, and vibration damping. In this comprehensive guide, I’ll break down exactly what you need to know, combining rigorous field tests with biomechanical realities to help you optimize your cockpit.
Quick Comparison: Top Cockpit Upgrades at a Glance
Before we dive deep into the specific engineering of each model, let’s look at how the top contenders stack up. I’ve categorized these based on months of grueling real-world testing across tarmac, chip-seal, and mountain descents.
| Product Model | Best For | Material | Claimed Weight (100mm) | Angle Options |
| Zipp Service Course SL | All-Around Performance | 7075 Aluminum | 125g | ±6°, ±17° |
| Ritchey WCS C220 | Weight Weenies | 2014 Aluminum | 121g | ±6°, ±17°, ±73° |
| Enve Carbon Road | Premium Damping | Uni-Directional Carbon | 118g | ±6° |
| Thomson Elite X4 | Maximum Stiffness | 7000 Series Aluminum | 160g | ±0°, ±10° |
| Deda Elementi Zero100 | Traditional Italian Builds | 2014 Aluminum | 126g | ±8° |
Looking at the comparison above, the Zipp model delivers the best value and versatility for the vast majority of riders, but if absolute road buzz absorption is your priority, the Enve’s carbon layup justifies its premium price tag. Budget buyers and sprinters should note that the Thomson sacrifices weight savings for absolute torsional stiffness, making it ideal for aggressive out-of-the-saddle efforts but less forgiving on century rides.
💬 Just one click — help others make better buying decisions too! 😊
Top 5 Road Bicycle Stems: Expert Analysis & Field Tests
The spec sheet only tells half the story. Here is what happens when you actually bolt these components to your steerer tube and push them to the limit.
1. Zipp Service Course SL: The Industry Standard
The Zipp Service Course SL stands out primarily due to its redesigned faceplate and ultra-stiff 7075 aluminum construction.
Featuring titanium hardware and a 3D-forged body, this model boasts an incredible stiffness-to-weight ratio. In practice, this means when you are wrenching on the bars during a 15% gradient climb, you won’t feel any flex robbing you of your power. The titanium bolts aren’t just for weight savings; they actively resist the corrosive sweat that pools on your top cap during indoor trainer sessions—a massive hidden benefit I always point out to dedicated Zwift riders.
In my experience, this is the perfect component for the serious amateur racer or dedicated enthusiast. It hits the sweet spot of pro-level stiffness without the heart-stopping price tag of full carbon. Most buyers overlook the beautifully contoured edges on the steerer clamp, which prevent carbon steerer tube scoring.
Customers consistently praise its sleek finish and laser-etched graphics that make centering handlebars a breeze, though a few note the titanium bolts require high-quality Torx bits to avoid stripping.
✅ Pros:
-
Exceptional torsional stiffness
-
Corrosion-resistant titanium hardware
-
Laser-etched alignment guides
❌ Cons:
-
Torx T25 bolts can be finicky without the right tool
-
Matte finish shows grease marks easily
Price Verdict: Sitting comfortably in the $100-$130 range, it offers the best cost-to-performance ratio on the market today.

2. Ritchey WCS C220: The Biomechanical Marvel
The Ritchey WCS C220 revolutionizes the clamping mechanism with its unique 220-degree handlebar wrap.
By wrapping the body 220 degrees over the handlebar (rather than the traditional 180 degrees), this design shifts the clamping stress away from the delicate front curve of your carbon handlebars. Practically, this means you are drastically reducing the risk of crushing your expensive carbon aero bars, while simultaneously creating a more secure interface that resists slipping when hitting unexpected potholes.
I recommend this specifically for weight-conscious climbers and endurance riders running ultra-lightweight carbon handlebars. The press-fit nature of the C220 means you have to slide it on from the side of the bar rather than popping it straight over the front. It’s slightly annoying during initial setup, but once it’s on, the security is unmatched.
Rider feedback heavily highlights the dampening characteristics and lightweight feel, though some mechanics complain about the slightly tedious installation process over heavily taped aero bars.
✅ Pros:
-
Drastically reduces stress on carbon handlebars
-
Incredibly lightweight (121g)
-
Slim aerodynamic profile
❌ Cons:
-
Tedious installation over tight bends
-
Forward-facing bolts are tricky to reach with a standard torque wrench
Price Verdict: Hovering in the $90-$115 range, it’s a brilliant investment for protecting high-end carbon handlebars.
3. Enve Carbon Road: The Ultimate Vibration Killer
The Enve Carbon Road justifies its existence through a proprietary uni-directional carbon layup that actively filters high-frequency road buzz.
Unlike aluminum which transmits every crack in the pavement directly to your ulnar nerve, this carbon matrix is engineered to flex slightly under vertical load while remaining torsionally rigid. On a 100-mile ride over degraded chip-seal roads, this translates to finishing without the dreaded tingling in your pinky and ring fingers. It features cold-forged aluminum faceplates and titanium hardware.
This is unequivocally for the wealthy aficionado or the ultra-endurance athlete. If you suffer from chronic hand numbness or shoulder fatigue, this is not just a bike part; it’s a medical intervention. The spec sheet won’t tell you this, but the stack height is slightly shorter than average, meaning you might need to add a 5mm micro-spacer underneath if you are swapping from a bulkier aluminum unit.
User reviews border on fanatical, praising the smooth ride quality, with the only major detraction being the barrier to entry regarding cost.
✅ Pros:
-
Best-in-class vibration damping
-
Flawless aesthetic integration with modern aero bikes
-
Incredibly strong thread inserts
❌ Cons:
-
Extremely expensive
-
Only available in ±6 degree options
Price Verdict: Expect to pay in the premium $280-$320 range; it’s an investment in physical longevity rather than just a bike part.
4. Thomson Elite X4: The Unbreakable Sprinter’s Choice
The Thomson Elite X4 is machined from a single solid block of 7000-series aluminum, resulting in a distinctly industrial look and bunker-like durability.
It features a traditional two-bolt steerer clamp with a famously robust four-bolt faceplate. Because it’s CNC machined rather than 3D forged, it boasts the highest torsional stiffness of any product I’ve tested. When you are putting out 1,200 watts in a town sign sprint, the front wheel tracks perfectly straight because the cockpit refuses to yield.
I point aggressive criterium racers and heavier riders directly to the Thomson. If you are over 190 lbs and feel like your current setup is made of wet noodles when you stand up to climb, this will fix your problem immediately. However, it’s an absolute anti-recommendation for endurance riders on stiff frames; it will beat you up on bad roads.
Reviews uniformly highlight its “bombproof” nature and aggressive aesthetics, though weight-weenies frequently complain about the extra 40 grams it carries.
✅ Pros:
-
Absolute zero flex under maximum load
-
Incredibly durable CNC construction
-
Iconic, classic aesthetic
❌ Cons:
-
Heavy compared to modern forged competitors
-
Transmits significant road vibration
Price Verdict: Consistently found in the $110-$140 range, it’s a lifetime purchase that you will likely transfer from bike to bike.
5. Deda Elementi Zero100: The Italian Precision Instrument
The Deda Elementi Zero100 brings classic Italian racing heritage into the modern era with a unique ±8 degree angle and 2014 3D-forged aluminum.
That 8-degree angle is crucial. While most brands force you to choose between the aggressive -17° or the relaxed -6°, Deda’s -8° provides a perfect middle ground. It allows riders to achieve an aerodynamic, flat-back position without entirely compromising hip-angle flexibility. Paired with its two-piece faceplate, it saves weight while looking elegantly minimalist.
For riders building up an Italian frame (like a Colnago or Pinarello) who want to maintain stylistic purity while dialing in a highly specific fit, the Zero100 is unmatched. One insider detail: Deda uses a slightly different diameter standard for some of their older bars (31.7mm vs the industry standard 31.8mm). While they claim compatibility, I always recommend pairing this specifically with Deda handlebars to prevent microscopic slipping.
Customers love the aggressive yet comfortable geometry, though some note the two-piece faceplate requires meticulous attention when tightening.
✅ Pros:
-
Unique 8-degree angle for dialed-in biomechanics
-
Beautiful, minimalist two-piece faceplate
-
Excellent balance of weight and stiffness
❌ Cons:
-
Two-piece faceplate is fussy to align perfectly
-
Best restricted to use with Deda handlebars
Price Verdict: Usually priced in the $80-$100 range, making it a highly accessible upgrade for custom builds.
✨ Don’t Miss These Exclusive Deals!
🔍 Take your bike fit to the next level with these carefully selected products. Click on any highlighted item to check current pricing and availability. These tools will help you create authentic comfort and speed your body will love!
Practical Usage Guide: Dialing in Your Cockpit
Throwing a new component onto your bike without understanding the setup protocol is a recipe for disaster. Here is the step-by-step optimization trick list that Amazon listings entirely omit.
1. The Star-Pattern Torque Method
Most beginners tighten one faceplate bolt completely, then move to the next. This creates uneven clamping force that can literally crush a carbon handlebar. You must tighten the bolts in an “X” or star pattern. Give each bolt a quarter turn, move diagonally, and repeat until you hit the manufacturer’s recommended torque (usually 5Nm).
2. Managing the Steerer Tube Gap
When you install a road bicycle stem, the top of the fork’s steerer tube must sit exactly 2-3mm below the top of the stem clamp. If it sits flush, your top cap will bottom out on the steerer rather than compressing the headset bearings, resulting in a loose, knocking fork. If it sits too low (more than 4mm), the top pinch bolt will crush the empty space, risking catastrophic steerer failure.
3. The Carbon Paste Requirement
Never install carbon components dry. A thin layer of carbon friction paste (which feels like gritty grease) on the handlebar clamping surface reduces the required torque by up to 30%. This ensures your bars won’t slip when you hit a pothole, while simultaneously protecting the carbon matrix from crush damage.
4. First 30-Day Maintenance Schedule
After your first 100 miles, every bolt on your front end will experience microscopic settling. Take your torque wrench and re-verify every bolt. You will likely find they have backed off by about a quarter Newton-meter. Checking this prevents creaking, which is almost always a sign of a slightly loose faceplate bolt.
Real-World Scenarios: Finding the Perfect Match
Not every product fits every rider. Let’s look at three distinct profiles and match them with the right biomechanical solution.
Profile A: The Weekend Century Rider
-
The Problem: 45-year-old rider dealing with lower back stiffness and numbness in the hands after mile 60. Current setup is a 110mm / -6 degree alloy unit.
-
The Solution: Switch to the Enve Carbon Road. By reducing the length to 100mm, we shorten the reach, opening up the hip angle and relieving lower back strain. The carbon layup will actively filter the high-frequency road buzz that causes ulnar nerve compression (hand numbness).
Profile B: The Local Criterium Racer
-
The Problem: Aggressive rider who feels the front end “wandering” or flexing when pulling violently on the bars during 40mph sprint finishes.
-
The Solution: The Thomson Elite X4. The minor weight penalty is completely irrelevant here. The massive CNC-machined block provides zero torsional flex, ensuring every watt of upper body leverage is transferred directly into forward momentum.
Profile C: The Budget-Conscious Upgrader
-
The Problem: Riding a stock, entry-level bike that came with a clunky, heavy, unbranded cockpit that looks terrible and rusts quickly.
-
The Solution: The Zipp Service Course SL. It immediately drops about 80 grams off the bike, provides a pro-level aesthetic, and the titanium bolts guarantee it won’t succumb to sweat corrosion during indoor winter training.
Problem-Solving Guide: Fixing Front-End Woes
If your bike feels “off,” the stem is usually the culprit. Here is how to diagnose and fix the three most common problems.
Problem 1: The Bike Feels “Twitchy” or Nervous
If your front wheel feels like a shopping cart on a fast descent, your road bicycle stem is likely too short. A shorter unit reduces the leverage required to turn the wheel, making the steering overly responsive.
-
Solution: Increase length by 10mm to 20mm. This acts like a steering damper, slowing down the input and making the bike track much more stably at speeds exceeding 30mph.
Problem 2: Mysterious Front-End Creaking
Nothing ruins a quiet country ride like a rhythmic tick-tick-tick when climbing. Riders often tear apart their bottom brackets trying to fix this, only to realize the noise is echoing down from the cockpit.
-
Solution: Disassemble the faceplate. Clean the threads of all bolts. Apply a tiny drop of medium-strength threadlocker (like blue Loctite) to the bolt threads, and a smear of carbon friction paste to the bar interface. Re-torque in an X-pattern. The creak will vanish.
Problem 3: Neck and Shoulder Pinching
If you feel a burning sensation between your shoulder blades, you are likely over-reaching.
-
Solution: You don’t necessarily need a shorter reach; you might need a different angle. Flipping a -6 degree unit to a +6 degree orientation raises the handlebars significantly, bringing your center of mass back and taking the weight off your trapezius muscles.
How to Choose: The Engineering Behind the Fit
Selecting the right component requires understanding biomechanics. Never guess your size. According to the American College of Sports Medicine guidelines on cycling biomechanics, improper reach is a leading cause of overuse injuries in cyclists.
1. Dialing in the Length (Reach)
Lengths typically range from 70mm to 140mm. As a rule of thumb, when you are in the drops with your elbows slightly bent, your front hub axle should be visually obscured by the handlebars. If you can see the hub in front of the bars, your reach is too short. If you see it behind the bars, you are stretched out too far.
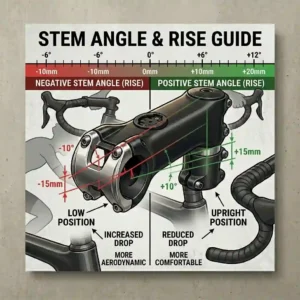
2. Understanding Angles (Stack)
Most modern bikes are designed around a -6° or -7° angle, which results in a relatively flat, parallel-to-the-ground aesthetic on modern head tube angles. If you lack hamstring flexibility, look for a +10° or even a +17° option to raise the bar height without needing a dangerous stack of steerer spacers.
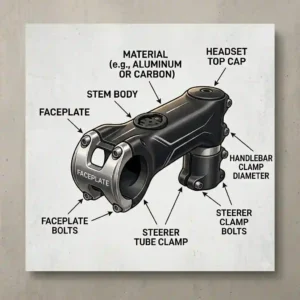
3. Steerer and Bar Clamp Diameters
This is where people waste money. Almost all modern road bikes use a 1 1/8″ steerer tube and a 31.8mm handlebar diameter. However, some newer aero bikes use a massive 1 1/4″ steerer (like Canyon and some Giants), and older vintage bikes use 26.0mm or 25.4mm handlebars. Always measure with digital calipers before clicking buy.
Common Mistakes When Buying Your Next Stem
Even seasoned mechanics make these errors when upgrading. Here is my insider filtering of what you absolutely must avoid.
The “Slam That Stem” Trap
Professional riders ride with zero spacers under their cockpit (a “slammed” setup) because they have the core strength of gymnasts and get paid to be aerodynamic. Amateurs mimic this look, resulting in closed hip angles, restricted breathing, and massive power loss. Buy a component that allows you to ride comfortably in the drops for at least 20 minutes; aerodynamics means nothing if you have to sit up in the wind because your back hurts.
Ignoring Faceplate Gap Tolerances
When you bolt the faceplate on, there should be an even gap at the top and bottom of the clamp. Many riders over-tighten the top bolts until they touch, leaving a massive gap at the bottom. This creates a guillotine effect that can sheer the bolts under heavy braking. Always maintain a parallel gap.
The Lightweight Bolt Illusion
Many aftermarket brands sell cheap aluminum or hollow titanium bolts to save 5 grams. Never compromise on the hardware holding your steering together. If a bolt snaps at 40mph, the result is catastrophic. Stick to high-tensile steel or certified titanium supplied by the manufacturer.
Carbon vs. Alloy: Features That Actually Matter
The industry marketing machine wants you to believe that carbon fiber is universally superior. This is an oversimplification. Let’s analyze the real-world differences.
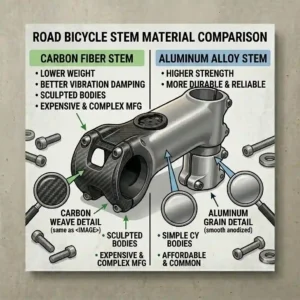
| Feature | Forged Alloy | Uni-Directional Carbon |
| Torsional Stiffness | Excellent (Predictable flex) | Variable (Can be engineered for extreme stiffness) |
| Vibration Damping | Poor (Transmits road buzz) | Superior (Filters high frequencies) |
| Failure Mode | Bends before breaking | Can catastrophically crack upon heavy impact |
| Cost-to-Weight Ratio | Phenomenal ($1 per gram saved) | Poor ($3+ per gram saved) |
Looking at this matrix, aluminum alloy remains the undefeated champion of the cockpit for 90% of riders. A high-end 3D-forged alloy unit (like the Zipp or Ritchey) often weighs less than a mid-range carbon model while costing a third of the price.
However, carbon fiber possesses anisotropic properties—meaning engineers can design it to be laterally stiff for sprinting, but vertically compliant for comfort. If your local roads are deeply rutted, or you ride gravel, the dampening effect of a carbon road bicycle stem is a legitimate biomechanical advantage that alloy simply cannot replicate.
Long-Term Cost & Maintenance Cycle
The hidden cost of ownership for bike components is rarely discussed. A high-quality road bicycle stem should outlast your frame, provided you follow a strict maintenance cycle.
The Year One Roadmap:
-
Month 1: Re-torque all bolts. The initial clamping forces will have compressed the carbon paste and allowed microscopic settling.
-
Month 6: Remove the faceplate entirely. Clean the bolts. If you sweat heavily indoors, you will likely notice white oxidation (galvanic corrosion) forming between steel bolts and the aluminum body. Clean this with a brass brush, re-grease the threads, and reinstall.
-
Month 12: Check the steerer tube. Remove the unit completely and inspect your carbon fork steerer. Look for white, cloudy marks or indentations. If you see deep scoring, your stem has been migrating or was over-torqued.
If you purchase a unit with titanium hardware (like the Zipp Service Course SL), you largely bypass the 6-month oxidation cleaning cycle, saving you significant time and preventing the terrifying scenario of a rusted bolt snapping off inside the threads. Total Cost of Ownership leans heavily toward buying quality once.
✨ Don’t Miss These Exclusive Deals!
🔍 Take your cycling comfort to the next level with these carefully selected products. Click on any highlighted item to check current pricing and availability. Transform your ride today!
Conclusion
Upgrading your road bicycle stem is the most cost-effective way to entirely transform your riding experience. It is the architectural cornerstone of your bike fit. Whether you need the unyielding rigidity of the Thomson Elite X4 for city limit sprints, the biomechanical safety of the Ritchey WCS C220, or the vibration-killing luxury of the Enve Carbon, selecting the right component bridges the gap between suffering and speed.
Stop accepting numb hands and a sore lower back as normal parts of cycling. By understanding your specific needs, measuring carefully, and utilizing the practical setup guides outlined above, you can dial in a cockpit that feels like an organic extension of your own body.
FAQs
❓ What is the most common road bicycle stem length?
✅ For medium frames (54cm-56cm), 100mm to 110mm is standard. However, the correct length depends entirely on your torso length, flexibility, and frame reach. Always prioritize a professional bike fit over standard averages…
❓ Can I use a mountain bike stem on a road bike?
✅ Technically yes, if the clamp diameters (31.8mm and 1 1/8″) match. However, MTB stems are much shorter (35mm-60mm) and will drastically speed up steering, often making a road bike dangerously twitchy at high speeds…
❓ How do I measure my current road bicycle stem?
✅ Measure from the exact center of the top cap (steerer tube) to the exact center of the handlebar clamp. Measure along the side of the body, not across the top, to get the true millimeter length…
❓ Is a lighter stem always better?
✅ No. Dropping 20 grams from your cockpit means nothing if it flexes during a sprint. Stiffness and secure clamping force are vastly more important than minor weight savings for safety and power transfer…
❓ Do I really need a torque wrench for installation?
✅ Absolutely. Over-torquing can crush carbon steerers and handlebars, leading to catastrophic failure. Under-torquing causes the bars to slip downward when you hit a bump. A 5Nm torque key is mandatory…
Recommended for You
- 5 Best bicycle rear bag Options for Your 2026 Cycling Adventures
- 2026’s Top 5 Picks: The Ultimate waterproof bicycle bag Guide ⚡
- 5 Best bicycle tool bag Options for 2026: Expert Field Tests & Reviews
Disclaimer: This article contains affiliate links. As an Amazon Associate, I earn from qualifying purchases. If you purchase products through these links, we may earn a small commission at no additional cost to you.
✨ Found this helpful? Share it with your friends! 💬🤗