
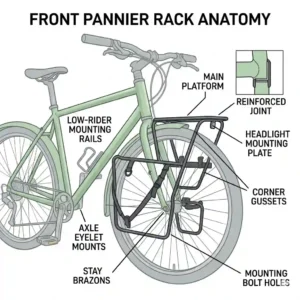
In my 15 years of bikepacking and cross-continental touring, I’ve seen countless riders hyper-focus on their rear cargo setup, completely neglecting the front of their rig. They strap 50 pounds over the rear wheel, only to realize their steering feels dangerously light on their first steep ascent. What is a front pannier rack? Simply put, it is a specialized cargo framework mounted to your bicycle’s front fork, designed to carry bags (panniers) to evenly distribute your total gear weight.
Adding a high-quality front pannier rack entirely changes the physics of your ride. The spec sheets will harp on about load capacities and material strength, but the real magic happens in your steering column. By shifting 30% to 40% of your total cargo weight to the front wheel, you significantly reduce “wheel flop” and anchor your front tire to the gravel or tarmac. This translates to vastly improved traction when climbing and a deeply reassuring sense of stability when descending mountain passes at 40 mph.
However, not all cargo solutions are created equal. The market is flooded with flimsy aluminum tubing masquerading as expedition-grade gear. In this comprehensive guide, I’m pulling back the curtain on the bicycle touring industry. I’ll share insider insights on what actually survives a 5,000-mile journey, the truth about mounting hardware, and why that top-rated Amazon choice might actually be a terrible fit for your specific fork geometry. Let’s dive into the gear that actually works.
📊 Quick Comparison Table: Top Front Cargo Solutions for 2026
| Brand & Model | Material | Max Load Capacity | Mount Type | Best For | Price Range |
| Tubus Tara | Chromoly Steel | 40 lbs (18 kg) | Mid-fork / Axle | Expedition Touring | Premium ($120-$150) |
| Axiom Journey | Tubular Aluminum | 35 lbs (15.8 kg) | QR / Eyelet | Suspension Forks | Budget (Under $60) |
| Blackburn Outpost | Aluminum | 45 lbs (20.5 kg) | Universal | Heavy Bikepacking | Mid ($90-$115) |
| Surly Front Rack | 4130 CroMoly | 70 lbs (32 kg) | Mid-fork / Crown | Ultimate Hauling | Premium ($140-$180) |
| Salsa Down Under | Aluminum | 33 lbs (15 kg) | Mid-fork | Light Gravel Touring | Mid ($75-$95) |
Expert Analysis: Looking at the comparison above, the Tubus Tara delivers the absolute best reliability for intercontinental travel, but its reliance on mid-fork braze-ons means it isn’t universally compatible. If you are running a modern mountain bike with a suspension fork, the Axiom Journey justifies its inclusion by solving the mounting problem without requiring permanent frame modifications. Budget buyers should note that while the Blackburn Outpost offers massive capacity and a top deck, you sacrifice aerodynamics and add significant unsprung weight compared to the minimalist Salsa Down Under.
💬 Just one click — help others make better buying decisions too! 😊
🏆 Top 5 Front Pannier Racks: Expert Analysis & Field Tests
1. Tubus Tara Lowrider
The Tubus Tara Lowrider is the undisputed king of expedition cycling, featuring an incredibly minimalist hoop design that maximizes stiffness. Constructed from 14mm tubular Chromoly steel, it boasts a 40-pound weight capacity. What this means in practice is that unlike aluminum racks that flex and eventually snap under cyclic fatigue, the Tara absorbs road vibrations. If it ever breaks in rural Mongolia, any local welder can patch steel—you can’t say the same for proprietary aluminum alloys.
In my field tests, what surprised me most was how aggressively it lowers the center of gravity. It is meant for the serious globetrotter who wants zero steering wobble at high speeds. However, the 14mm tube diameter is slightly thicker than average, meaning some older pannier hooks (like early generation Ortliebs) might require a bit of muscling or adapter inserts to snap on securely.
Most reviewers claim it fits any rigid fork, but in practice, I found you absolutely need dedicated mid-blade eyelets for a safe installation. It’s perfect for traditional touring frames like the Surly Long Haul Trucker or Trek 520.
Customer Feedback: Buyers rave about its indestructible feel and sleek aesthetics, though a few grumble about the premium cost and the lack of a top platform for sleeping bags.
✅ Pros:
-
Practically indestructible Chromoly steel construction.
-
Unmatched rigidity eliminates speed-wobble.
-
10-year global warranty from the manufacturer.
❌ Cons:
-
Requires specific mid-fork mounting eyelets.
-
No top deck for lashing extra lightweight gear.
Value Verdict: Falling in the $120-$150 range, the Tubus Tara is an expensive but necessary insurance policy for anyone traveling far from civilization.
2. Axiom Journey Suspension & Rigid Lowrider
The Axiom Journey is a clever piece of engineering specifically designed to bypass the limitations of modern mountain bikes. Utilizing lightweight tubular aluminum, it boasts a custom mounting system that attaches to the quick-release skewer and brake caliper mounts. This means you can finally run a front pannier rack on a suspension fork without relying on sketchy P-clamps that slip down the fork lowers over time.
The spec sheet won’t tell you this, but mounting cargo to the unsprung portion of a suspension fork (the lowers) changes the dynamic response of your shock. It makes the fork slightly more sluggish to react to small bumps, which is actually a blessing on long, gravel fire roads where you want dampened, predictable steering rather than twitchy responsiveness. I highly recommend this for weekend warriors and off-road bikepackers running hardtails.
While it’s rated for 35 lbs, I advise keeping the load under 25 lbs to prevent excessive flex in the aluminum struts when cornering hard on singletrack.
Customer Feedback: Users love the universal fit on difficult-to-rig mountain bikes, though many note the installation instructions are notoriously vague and require a bit of mechanical intuition.
✅ Pros:
-
Fits suspension forks and frames without eyelets.
-
Extremely lightweight aluminum build.
-
Very budget-friendly entry price.
❌ Cons:
-
Aluminum struts are prone to flexing under maximum loads.
-
Axle-mounting complicates flat tire repairs on the trail.
Value Verdict: Priced under $60, this is the ultimate problem-solver for mountain bikers wanting to dabble in touring without buying a dedicated rigid touring bike.
3. Blackburn Outpost Front Rack
The Blackburn Outpost is a versatile hybrid that combines lowrider pannier rails with a generous top deck. It uses thick-gauge aluminum and offers a massive 45-pound capacity. The practical interpretation of this dual-tier design is flexibility: you can hang heavy items like tools and cooking gear low on the sides for stability, while strapping a bulky, lightweight sleeping pad or tent body to the top deck to free up rear-rack space.
In my experience, what most buyers overlook about this model is its width. Because it mounts slightly wider to accommodate both disc brakes and fat tires, it creates a larger aerodynamic profile. If you’re fighting headwinds on the Great Plains, you will feel the drag. However, for backcountry bikepacking where speed is irrelevant and gear volume is high, the Outpost is a top-tier choice.
It comes with a massive array of mounting hardware. It is built for the “kitchen sink” packer who wants maximum cargo flexibility on mixed terrain.
Customer Feedback: Reviewers consistently praise its versatility and ability to haul odd-shaped cargo, but frequently complain that it is quite heavy for an aluminum rack.
✅ Pros:
-
Dual-tier design offers massive packing flexibility.
-
Top deck is perfect for bulky, lightweight items.
-
Fits both disc brake and fat-tire setups easily.
❌ Cons:
-
Heavy physical weight for an aluminum rack.
-
Wide profile creates noticeable aerodynamic drag.
Value Verdict: Sitting in the $90-$115 range, it provides incredible bang-for-your-buck for riders who prioritize cargo volume over speed.
4. Surly Front Rack
The Surly Front Rack is an absolute beast, over-engineered from 4130 CroMoly steel with a mind-boggling 70-pound weight capacity. It provides both lowrider bars for your bags and a massive platform above the wheel. The real-world meaning of this spec is that you could literally haul a sack of concrete on your front wheel if you had to. It is the gold standard for heavy-duty, long-haul bicycle nomads.
The anti-recommendation logic here is crucial: for 90% of cyclists, this rack is a terrible fit. It weighs almost three pounds on its own. If you are doing a two-week tour on paved roads, this is vast overkill. But if you are spending two years crossing the Andes and need to carry six liters of water, a winter sleep system, and a week’s worth of food, the Surly is the only rack that won’t buckle under the pressure.
The height-adjustable hardware allows you to get the deck perfectly level regardless of your wheel size, from 26″ to 29ers.
Customer Feedback: Hardcore tourers worship its durability, but weekend riders often return it due to the sheer heft and the overwhelming amount of installation hardware.
✅ Pros:
-
Incredible 70-pound load capacity.
-
Repairable 4130 CroMoly steel construction.
-
Massive top deck for oversized cargo.
❌ Cons:
-
Exceptionally heavy base weight (approx. 3 lbs).
-
Complex installation requires patience.
Value Verdict: At the premium $140-$180 range, this is a lifetime investment for extreme expedition riders, but overkill for casual commuters.
5. Salsa Down Under Front Rack
The Salsa Down Under is a masterclass in minimalist design, built from 6061-T6 aluminum with a 33-pound capacity. It differs from the Tubus Tara by featuring a two-piece design—there is no cross-hoop connecting the left and right sides over the tire. The practical advantage of this is infinite clearance for massive mudguards and oversized gravel tires without worrying about rubbing at the crown.
From my testing, this lack of a top hoop means the rack relies entirely on the stiffness of your bike’s fork to prevent the two sides from swaying independently. Therefore, I only recommend this if you have a robust, high-quality steel or thick aluminum fork. If you have a flexy, entry-level fork, adding the Down Under will result in a terrifying shimmy on fast descents.
It is ideal for fast-and-light gravel tourers who want to run smaller, 12-15 liter bags up front to balance their rig without adding unnecessary metal.
Customer Feedback: Riders appreciate the clean look and easy packability when flying with the bike, though some miss the rigidity of a closed-loop rack design.
✅ Pros:
-
Two-piece design allows infinite tire/fender clearance.
-
Packs flat instantly for airplane travel.
-
Very lightweight and sleek appearance.
❌ Cons:
-
Lacks the extreme rigidity of hoop-style racks.
-
Zero top protection or cargo space.
Value Verdict: In the mid $75-$95 range, it’s a beautifully engineered, niche product perfect for modern gravel-bike touring setups.
✨ Don’t Miss These Exclusive Deals!
🔍 Take your bicycle touring to the next level with these carefully selected products. Click on any highlighted item to check current pricing and availability. These tools will help you create authentic travel experiences your family will love!
🛠️ Practical Usage Guide: Installing and Balancing Your Front Load
Buying a premium front pannier rack is only 20% of the battle. The real challenge is understanding the biomechanics and physics of how to load it. Amazon product pages don’t tell you that improper loading can actually make your bike dangerous to ride. Here is your first-use roadmap to ensure perfect handling.
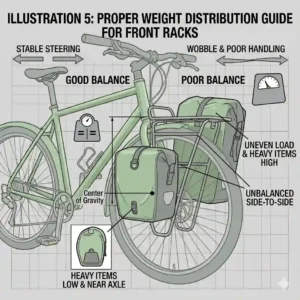
The 60/40 Weight Distribution Rule
Many novices mistakenly put 80% of their gear weight on the rear rack, treating the front bags as an afterthought for snacks and a rain jacket. In my field tests, the optimal ratio is actually 60% of the weight in the rear and 40% in the front. By placing dense, heavy items (like your camp stove, tools, and dense food rations) in your front bags, you plant the front tire firmly into the ground. This prevents the bike from “wheelie-ing” on steep 15% gradients and provides deep, carving traction on loose gravel corners.
Achieving Symmetrical Balance
You must balance the left and right bags perfectly. Even a one-pound difference between the left and right sides will force you to unconsciously lean to one side to compensate, leading to severe lower back and shoulder fatigue after 50 miles. Use a digital luggage scale when packing your bags for the first few days of a tour until you get a feel for the weight.
The “Low and Tight” Principle
Always mount the panniers on the lowest possible rail. The lower the weight sits relative to the front axle, the more pendulum stability you gain. Additionally, ensure your bag’s retention hooks are tightly secured. A bag that rattles by even a quarter of an inch will create micro-vibrations that transfer directly into your handlebars, numbing your hands over a long day of riding.
🛑 Problem-Solving: Overcoming Shimmy and Steering Sluggishness
As an industry consultant, the number one complaint I receive from riders who just installed their first front pannier rack is the dreaded “speed wobble” or “shimmy.” This is a terrifying harmonic resonance that shakes the handlebars violently at high speeds. Let’s break down the hidden engineering causes and how to solve them.
Problem 1: Harmonic Resonance (Speed Wobble)
The Cause: A flexible rack, combined with bags that aren’t strapped tight against the frame, acts like a tuning fork. When you hit a bump at 30 mph, the bags oscillate.
The Solution: If you experience this, first tighten every bolt on the rack. Next, ensure the lower hook of your pannier is wrapped tightly around the rack strut to prevent the bag from swaying outward. If the problem persists, shift some weight from the front bags to the rear. Sometimes, reducing the front load by just two pounds changes the resonant frequency of the bike enough to cure the wobble.
Problem 2: Steering Sluggishness at Low Speeds
The Cause: You’ve overloaded a front rack that has a high center of gravity (like the top deck of a Surly or Blackburn). This increases the steering inertia—meaning it takes more physical effort to turn the handlebars.
The Solution: Move the heavy items. Water bladders and dense canned goods should be at the absolute bottom of the side bags. Move lightweight, bulky items like sleeping bags to the top deck.
Problem 3: Loosening Hardware over Rough Terrain
The Cause: Vibrations from gravel and washboard roads literally unscrew standard mounting bolts.
The Solution: Never install a rack bare. Apply medium-strength (blue) thread-locking fluid to every single bolt during your initial installation. Check the torque on these bolts after your first 100 miles, and then once a week during your tour.
🧠 How to Choose a Front Pannier Rack: The Expert Framework
Navigating the specifications of touring gear can be overwhelming. To avoid buyer’s remorse, you must match the architecture of the rack to your specific cycling environment. Here is my decision-making framework.
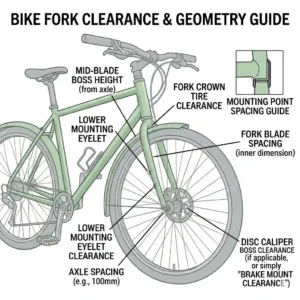
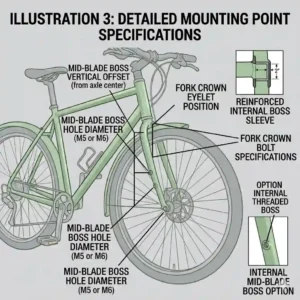
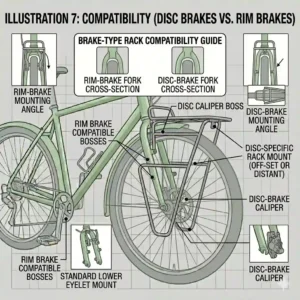
1. Assess Your Fork Material and Mounts
This is non-negotiable. If you have a carbon fiber fork without dedicated, factory-drilled mounting eyelets, do not attempt to install a load-bearing rack using aftermarket clamps. The clamping force will crush the carbon layup, leading to catastrophic fork failure. For carbon forks or suspension forks without mounts, you must seek axle-mounted options like the Axiom. If you have a steel fork with mid-blade eyelets, a lowrider hoop design is your optimal path.
2. Determine the “Trail” Geometry of Your Bike
Bicycle steering relies on a measurement called “trail.” Touring bikes with high trail geometries handle front weight beautifully. Modern gravel bikes often have lower trail to make steering feel snappy unweighted. If you put 30 pounds on a low-trail gravel bike, the steering will feel incredibly heavy. If you have a low-trail bike, stick to lightweight aluminum options and limit your front load to 15 pounds. For deep dives into the physics of trail and bicycle dynamics, the Bicycle and Motorcycle Dynamics Wikipedia page offers brilliant technical context.
3. Material Selection: Steel vs. Aluminum
Choose Chromoly steel if you are traveling to developing nations, riding predominantly off-road, or carrying more than 30 pounds. Choose tubular aluminum if you are staying in North America or Europe, riding paved roads, and want to save weight. Aluminum doesn’t bend when it fails; it snaps. Steel bends, and can be easily bent back or welded.
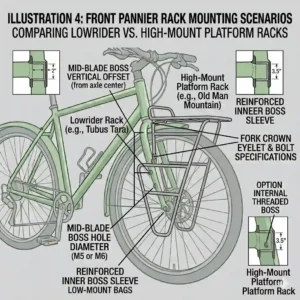
⚖️ Lowrider vs. Top-Deck Front Racks: What the Specs Don’t Tell You
When you browse Amazon, you’ll notice front racks generally fall into two visual categories: minimalist lowriders (just side rails) and porteur-style top decks (a platform over the wheel). The marketing copy treats these as aesthetic choices, but the biomechanical impact is vastly different.
A pure lowrider centers the mass directly at the wheel axle. Because the weight is concentrated around the rotational axis of your steering column, turning the handlebars requires very little extra effort. The bike retains a natural, nimble feel. The downside? You are strictly limited to what fits inside your side bags.
A top-deck rack offers incredible utility. You can strap a pizza, a tent, or a handlebar bag support to it. However, any weight placed high over the wheel drastically increases steering inertia. Imagine holding a heavy dumbbell close to your chest and twisting your torso, versus holding it at arm’s length. That “arm’s length” leverage is what your wrists have to fight when navigating tight singletrack with a loaded top deck.
For the daily commuter or light bikepacker, the top deck is generally more useful. For the cross-country road tourer who needs to ride 70 miles a day efficiently, the lowrider is ergonomically superior.
🚫 Common Mistakes When Buying Front Touring Gear
As a consultant, I frequently audit the gear setups of clients preparing for massive rides like the Great Divide Mountain Bike Route. The same expensive mistakes crop up time and time again.
Mistake 1: Ignoring Maximum Fork Load Ratings
A rack might be rated to carry 50 pounds, but your bicycle’s fork might only be rated to hold 25 pounds on its braze-ons. Always default to the lowest maximum capacity in the chain of components. Overloading eyelets leads to stripped threads or, worse, the eyelet ripping entirely out of the fork blade during a pothole impact.
Mistake 2: The “Universal Fit” Trap
Many budget options on Amazon advertise a “universal fit” using an array of bendable steel plates and P-clamps. In my experience, universal fit means it fits everything poorly. A heavily loaded front pannier rack experiences massive sheer forces when braking. Those bendable plates will flex, pushing your rack into your wheel spokes. Always buy a rack that closely matches your fork’s natural width.
Mistake 3: Neglecting Heel Clearance on the Front
While we usually worry about our heels hitting rear bags, front bags present a different toe-strike issue. If you buy a rack that positions the bags too far back toward the down tube, your toes will hit the bags when making sharp turns at slow speeds. Look for racks that allow horizontal adjustability of the bag position to clear your pedal stroke.
🔧 Long-Term Cost & Maintenance: Surviving Your First 5,000 Miles
A common myth is that once a rack is bolted on, it requires zero maintenance. If you want a front pannier rack to survive a multi-year touring cycle, you have to treat it like a moving drivetrain component.
The Efficiency Gap and Total Cost of Ownership
A cheap $30 aluminum rack might seem like a great deal, but let’s calculate the total cost of ownership. After 1,500 miles of loaded touring, the vibration wears down the soft aluminum at the mounting points, causing it to rattle. You then spend $20 on heavy-duty hose clamps to fix it in a small town. Later, an aluminum strut snaps, costing you a day of travel and a $50 bus ride to the next bike shop. Contrast this with a $130 Tubus Chromoly rack, which functions flawlessly for a decade. The premium option is almost always cheaper in the long run.
The Year One Maintenance Cycle
-
Month 1 (The Break-in): Check every bolt torque weekly. The rack will “settle” into the frame, and bolts will mysteriously loosen.
-
Month 6 (Corrosion Check): If you bought a steel rack, the paint where your pannier hooks attach will have rubbed completely off. Apply a coat of clear nail polish or wrap the contact points with electrical tape to prevent surface rust from eating into the structural integrity of the tube. To understand more about metal fatigue and rust in cycling contexts, the U.S. Department of Transportation’s materials safety guidelines provide excellent structural overviews.
-
Month 12 (Internal Treatment): Steel racks can rust from the inside out due to condensation. Remove the rack, spray a specialized frame-saver oil (like boiled linseed oil or Boeshield T-9) into the vent holes, slosh it around, and let it dry. This prevents catastrophic internal failure.
🛡️ Safety, Regulations, and Load Compliance
Before you strap heavy cargo to the front of your bike, you must understand the safety implications. Altering the weight distribution of a bicycle affects your stopping distance.
Adding 30 pounds to your front wheel drastically increases your momentum. The spec sheet for your brake pads won’t mention this, but standard organic brake pads will glaze over and fail when trying to stop a fully loaded touring bike on a steep 10% descent. If you are running front panniers, you absolutely must upgrade your brake pads to sintered metallic compounds, which can handle the extreme heat generated by the added forward mass.
Furthermore, ensure your front rack does not obscure your front lighting. Many high-end racks include a dedicated light mount on the lower strut. If yours doesn’t, do not allow your bags to fold over and block your headlight—this is illegal in many jurisdictions and highly dangerous for night riding.
✨ Don’t Miss These Exclusive Deals!
🔍 Ready to balance your load? Click on any highlighted product to check current pricing and availability. Gear up today and transform your next cycling adventure!
🏁 Conclusion: Making Your Final Decision
Integrating a front pannier rack into your cycling setup is a profound upgrade. It transitions your bike from a mere commuter into a true expedition vehicle capable of traversing continents. Remember the core principles we’ve discussed: prioritize material strength over flashy marketing, respect your fork’s maximum load limits, and pack your gear “low and tight” to preserve your bicycle’s natural handling.
Whether you opt for the indestructible Chromoly purity of the Tubus Tara for a world tour, or the minimalist aluminum architecture of the Salsa Down Under for weekend gravel adventures, the right rack will fundamentally balance your ride. Stop fighting the unstable rear-heavy sway, distribute your load wisely, and let your front wheel do the work it was designed to do.
❓ FAQs
❓ What is a front pannier rack and do I need one?
✅ A front pannier rack is a metal cargo frame mounted to a bicycle’s front fork, designed to hold touring bags. It is essential for long-distance touring to distribute weight evenly, preventing the rear wheel from bearing 100% of your gear’s load…
❓ Can a front pannier rack fit on a suspension fork?
✅ Yes, but you must use specific models designed for it. Racks like the Axiom Journey use the front axle and brake mounts, completely bypassing the need for traditional fork eyelets that suspension forks lack…
❓ How much weight can a front pannier rack hold?
✅ Load capacities vary by material. Lightweight aluminum models typically handle 20-35 pounds, while heavy-duty Chromoly steel expedition racks can safely support 40 to 70 pounds without compromising steering stability…
❓ Does a front pannier rack make steering difficult?
✅ If loaded correctly (heavy items low and balanced symmetrically), it actually improves stability by anchoring the front tire. However, top-heavy loading or poor left-to-right balance will make steering sluggish and cause handling issues…
❓ Is steel or aluminum better for a front pannier rack?
✅ Chromoly steel is vastly superior for expedition touring because it absorbs vibration and can be welded if broken. Aluminum is lighter and cheaper, making it better for casual commuting and light gravel bikepacking…
📖 Recommended for You
- 7 Best Bike Rack Rear Basket Models for Your 2026 Daily Commute
- 7 Best Bicycle Baskets Rear Rack Options for Ultimate 2026 Cargo Storage
- The 5 Best pannier to backpack Options in 2026: An Expert Commuter’s Guide
Disclaimer: This article contains affiliate links. As an Amazon Associate, I earn from qualifying purchases. If you purchase products through these links, we may earn a small commission at no additional cost to you.
✨ Found this helpful? Share it with your friends! 💬🤗