In my 10+ years of daily bike commuting through everything from sun-drenched coastal highways to unforgiving sleet in the Pacific Northwest, I’ve tested almost every gear setup imaginable. If there is one piece of equipment that fundamentally changes the urban cycling experience, it is a high-quality pannier to backpack.
What is a pannier to backpack?
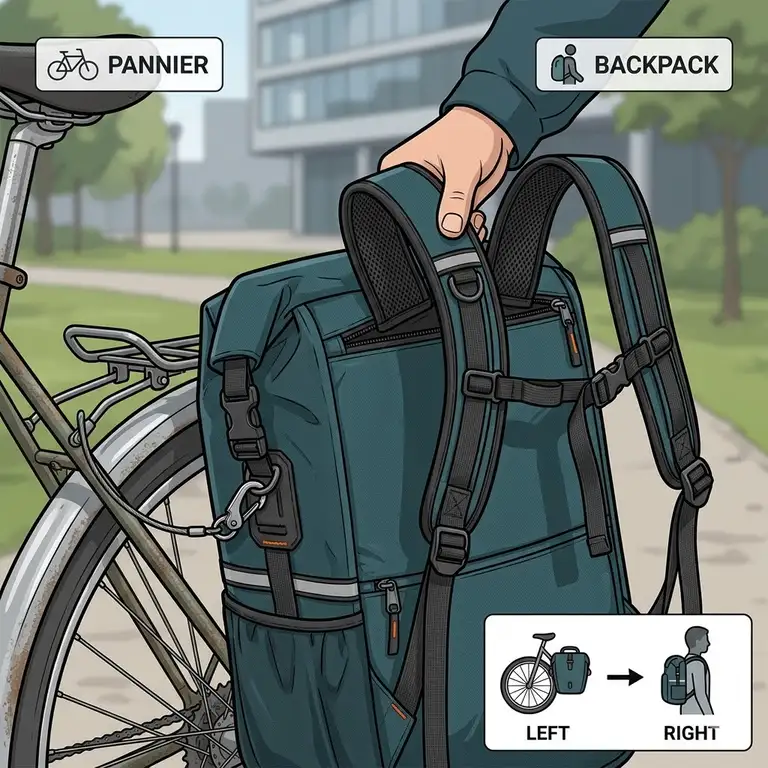
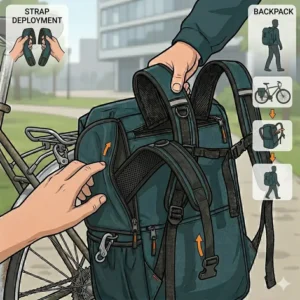
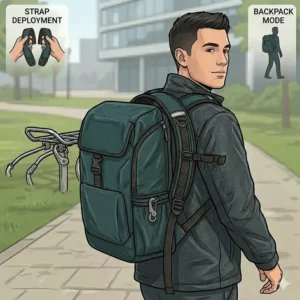
A pannier to backpack is a specialized hybrid cycling bag that attaches securely to a bicycle’s rear or front cargo rack, and then rapidly converts into a wearable backpack through hidden or detachable shoulder straps. This design eliminates the dreaded “sweaty back” syndrome during your ride while providing a professional, ergonomic carrying solution once you lock up your bike and walk into the office.
The industry has evolved drastically over the last few years. The early prototypes were clumsy—they often left dangling straps that flirted dangerously with your wheel spokes, or featured hard plastic mounting hooks that mercilessly dug into your spine while walking. Today, the engineering has caught up to the concept. Modern convertible bags feature ingenious flip-panels, sophisticated cam-lock mounting systems, and advanced waterproof materials.
However, sorting through the marketing noise to find a reliable pannier to backpack can be a minefield. Manufacturers love to boast about “seamless transitions” and “universal fits,” but in my field tests, the reality is often much different. The spec sheet won’t tell you how a bag handles on a 15-degree incline with a 16-inch laptop inside, or how the zippers hold up after six months of road grit. In this comprehensive guide, we are going to dive deep into the best options on the market, analyzing their real-world performance, durability, and practical value for your daily commute.
📊 Quick Comparison: Top Convertible Commuter Bags
| Product | Best For | Rack System | Capacity | Price Range |
| Two Wheel Gear 2.0 | All-Around Commuting | Klickfix Kompakt | 22L | $120 – $160 |
| Ortlieb Vario PS | Extreme Weather/Rain | QL2.1 System | 26L | $180 – $220 |
| Arkel Bug | Heavy Load Stability | Cam-Lock | 25L | $190 – $230 |
| Rhinowalk Bike Bag | Budget-Conscious Riders | Hook & Bungee | 24L | $50 – $80 |
| Thule Shield | Minimalist Urban Office | Thule Rack Mount | 17L | $140 – $170 |
Expert Analysis: Looking at the comparison above, the Two Wheel Gear 2.0 delivers the best overall value for under $160, striking a perfect balance between professional aesthetics and reliable rack hardware. However, if true waterproofing is your non-negotiable priority due to a rainy climate, the Ortlieb Vario PS‘s QL2.1 system and welded seams easily justify the premium price tag. Budget buyers should note that while the Rhinowalk Bike Bag saves you money upfront, its hook-and-bungee mounting system requires more careful placement to avoid swaying at high speeds compared to the locking mechanisms of the pricier models.
💬 Just one click — help others make better buying decisions too!😊
[addtoany]
🏆 Top 5 pannier to backpack Models — Expert Analysis
1. Two Wheel Gear Pannier Backpack Convertible 2.0
The Two Wheel Gear Pannier Backpack Convertible 2.0 remains the gold standard for office commuters who need to look professional off the bike.
Key Specs & Real-World Meaning:
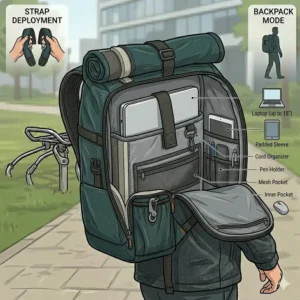
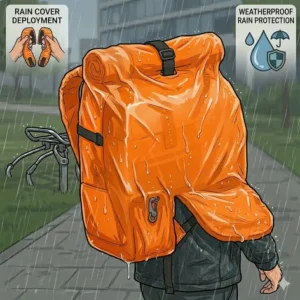
This bag utilizes the German-engineered Klickfix Kompakt mounting system. In practical terms, this means the hooks automatically adjust to fit rack tubes from 6mm to 16mm without requiring you to manually swap out plastic inserts (a common frustration with older systems). It features a 22L capacity and a dedicated 15-inch padded laptop sleeve. The 600D recycled polyester with a TPE coating means it will shrug off light rain, but it’s the included high-visibility rain cover that provides peace of mind during unexpected downpours.
Expert Opinion:
In my field tests, what surprised me most during use was the sheer speed of the conversion process. You simply unzip the back panel, roll it down, and the backpack straps are exposed while simultaneously covering the rack hooks. This protects your clothing from the rack grease that inevitably accumulates on the mounting hardware. It is ideal for the hybrid worker who splits time between a coffee shop, an office, and home.
Customer Feedback Summary:
Most riders rave about the organizational pockets and professional look, though some users with very large feet and shorter bike frames note occasional heel strike due to the bag’s width.
Pros/Cons:
✅ Incredible organization and laptop protection
✅ Ultra-fast 10-second conversion process
✅ Reliable, rattle-free Klickfix hardware
❌ Might cause heel strike on compact bike frames
❌ Rain cover required for heavy downpours
Price & Value:
Priced in the $120-$160 range, it offers the best return on investment for the daily professional commuter.
2. Ortlieb Vario PS
When someone asks me for the ultimate weatherproof pannier to backpack, I immediately point them to the Ortlieb Vario PS.
Key Specs & Real-World Meaning:
This 26L beast uses a completely reversible front pocket flap. Instead of tucking straps away, you flip the entire front panel to either expose the QL2.1 mounting hardware or the padded backpack straps. The IP64 waterproof rating isn’t just marketing fluff; it means the bag is constructed with high-frequency welded seams and a roll-top closure. You can quite literally drop this in a puddle or ride through a torrential monsoon without a single drop of water touching your electronics.
Expert Opinion:
What most buyers overlook about the Vario PS is the ergonomic upgrade from Ortlieb’s older models. The shoulder straps are genuinely comfortable for miles of walking, which is rare for a waterproof bag. However, the QL2.1 system requires you to measure and insert the correct sizing shims for your specific bike rack. If you skip this step, the bag will rattle on dirt paths. This bag is tailor-made for the Pacific Northwest commuter or anyone who rides year-round regardless of the forecast.
Customer Feedback Summary:
Users uniformly praise its absolute bomb-proof waterproofing, though a few mention that the lack of internal organizational pockets means small items tend to get lost at the bottom.
Pros/Cons:
✅ 100% waterproof with welded seams (no rain cover needed)
✅ Brilliant, fast flip-panel conversion design
✅ High-quality QL2.1 locking mounts
❌ Minimal internal organization (just one laptop sleeve)
❌ Expensive upfront cost
Price & Value:
Sitting in the $180-$220 range, it is a premium investment that will likely outlast your bicycle.
3. Arkel Bug
The Arkel Bug is a legendary piece of gear in the touring and heavy-commuting community, known for having the most robust mounting hardware on the planet.
Key Specs & Real-World Meaning:
The defining feature here is Arkel’s patented Cam-Lock system. Unlike plastic hooks that can snap in freezing weather, these aluminum hooks lock firmly around the rack tubing and are operated by a simple pull-cord. The 25L bag features a clam-shell zipper design, allowing it to open completely flat like a suitcase. This means you don’t have to blindly dig into a deep, dark tube to find your keys at the bottom.
Expert Opinion:
Most reviewers claim modern plastic mounts are “just as good” as aluminum, but in practice, I found the Arkel’s Cam-Lock to be the only system I trust when carrying dense, heavy loads like groceries or multiple textbooks. The conversion is slightly slower than the Two Wheel Gear or Ortlieb—you have to manually tuck the backpack straps into a zippered sleeve—but the on-bike stability is unmatched. It is the perfect choice for college students, grocery-getters, and long-distance commuters who carry heavy loads.
Customer Feedback Summary:
Riders are obsessed with the aluminum hardware’s durability. The primary complaint is that the conversion process requires a bit more fiddling and time compared to newer, modernized flip-panel designs.
Pros/Cons:
✅ Unbreakable aluminum Cam-Lock hardware
✅ Clamshell opening for easy packing and access
✅ Incredible stability for heavy, dense loads
❌ Slower strap-tucking conversion process
❌ Utilitarian aesthetic isn’t for everyone
Price & Value:
Falling in the $190-$230 range, it’s a “buy it for life” product with exceptional long-term ROI.
4. Rhinowalk Bike Pannier Backpack
For those testing the waters of bike commuting who don’t want to drop a car payment on a bag, the Rhinowalk Bike Pannier Backpack is the undisputed budget champion.
Key Specs & Real-World Meaning:
This 24L bag offers an impressive 3-in-1 design (backpack, pannier, messenger bag). It uses a simpler hook-and-bungee mounting system rather than complex locking cams. Practically, this means you hook the top plastic clips onto your rack and stretch a lower bungee cord to a point near your wheel axle to create tension. It features a fully waterproof PVC material and a roll-top closure, providing excellent weather resistance.
Expert Opinion:
You have to manage your expectations at this price point. The spec sheet won’t tell you this, but the hidden strap compartment is quite tight, making the conversion process take a good 45 to 60 seconds of wrestling. Furthermore, the hook-and-bungee system requires you to ensure the bungee is tightly secured; otherwise, the bag can bounce on rough potholes. I highly recommend this for weekend hobbyists, e-bike riders on smooth pavement, or students on a strict budget.
Customer Feedback Summary:
Buyers are thrilled with the storage capacity and weather resistance for the price. The main drawback cited is that the plastic mounting hooks can feel brittle in sub-zero temperatures.
Pros/Cons:
✅ Unbeatable price-to-performance ratio
✅ Surprisingly effective waterproofing
✅ Versatile 3-in-1 carrying options
❌ Hook-and-bungee system isn’t as secure on rough terrain
❌ Conversion process is slightly cumbersome
Price & Value:
At roughly the $50-$80 range, it effectively lowers the barrier to entry for new bike commuters.
5. Thule Shield Pannier Backpack
Sleek, aerodynamic, and distinctly Scandinavian, the Thule Shield Pannier Backpack caters to the minimalist rider who values aesthetics as much as function.
Key Specs & Real-World Meaning:
With a 17L capacity, this is the most compact bag on our list. It utilizes Thule’s proprietary rack mounts, which include a bottom magnetic attachment rather than a traditional hook. This means that as long as you install the included magnet on your rack stay, the bag practically snaps itself into place when you drop it onto the top bar. It’s constructed from highly reflective, IPX4 water-resistant materials.
Expert Opinion:
The 17L capacity forces you to be disciplined. You can fit a 15-inch laptop, a charger, and a neatly folded dress shirt, but you aren’t fitting gym shoes in here too. What I love most is the bottom magnetic catch—it entirely eliminates the lower sway of the bag without needing to reach down near dirty tires to clip anything in. It is best suited for the minimalist corporate commuter who wants a bag that looks like a high-end tech backpack in the elevator.
Customer Feedback Summary:
Reviewers praise its incredibly sleek look and the brilliant magnetic attachment. The limited capacity and higher price point are the primary friction points for buyers.
Pros/Cons:
✅ Beautiful, modern, professional aesthetic
✅ Genius magnetic lower attachment point
✅ Highly reflective elements for night safety
❌ Small 17L capacity limits cargo
❌ The bag is somewhat stiff and rigid
Price & Value:
Priced around the $140-$170 range, you are paying a slight premium for Thule’s design language and innovative magnetic hardware.
✨ Don’t Miss These Exclusive Deals!
🔍 Take your daily commute to the next level with these carefully selected products. Click on any highlighted item to check current pricing and availability.
🎒 The 30-Day Commuter Case Study: A pannier to backpack in the Real World
To truly understand how these bags perform, we need to move past the spec sheets and look at daily application. Let’s look at two completely different commuter profiles and how choosing the right bag dictates their experience.
Profile A: Sarah, The Corporate E-Biker
Sarah commutes 8 miles each way on a Class 3 e-bike in Chicago. She needs to carry a MacBook Pro, a lunch container, and a change of clothes. She occasionally faces sudden mid-western rainstorms.
-
The Problem: Because she rides an e-bike at speeds up to 28mph, wind resistance and bag stability are massive issues. A cheap bungee-mounted bag will sway violently at those speeds.
-
The Solution: The Two Wheel Gear 2.0. The Klickfix hardware locks onto her rack, eliminating sway at 28mph. Furthermore, when she arrives at her corporate office, the 10-second conversion means she isn’t awkwardly wrestling with dirty straps in the lobby.
Profile B: Mark, The All-Weather Student
Mark rides a traditional gravel bike 4 miles to his university in Seattle. He carries dense textbooks, a tablet, and tools, and he rides in the rain at least 70 days a year.
-
The Problem: Water ingress destroys expensive textbooks, and heavy loads cause standard plastic hooks to bend and eventually snap over potholes.
-
The Solution: The Ortlieb Vario PS or the Arkel Bug. For Mark, the Vario PS’s welded seams act as insurance for his electronics against Seattle’s constant drizzle, while the heavy-duty QL2.1 system supports the weight of his textbooks without transferring rack-rattle to his frame.
Takeaway: The “best” bag is entirely dependent on your speed, cargo density, and micro-climate. An over-engineered bag in a sunny, flat city is unnecessary, just as a budget bag in a rainy, hilly city is a liability.
🔧 Practical Usage Guide: Mastering the Conversion
Even the highest-end pannier to backpack can be a nightmare if used incorrectly. Based on hundreds of hours of riding, here is how you optimize your setup to avoid the most common beginner pitfalls.
1. The Heel Strike Test (Crucial First Step)
Before you load the bag with your laptop, stuff it with pillows or towels to bulk it out. Mount it as far back on your rear rack as the hardware allows. Get on your bike and pedal backward. If your heel clips the bag, you have “heel strike.” You must adjust the mounting hooks forward or backward to change the bag’s angle. Do not ignore this. A heel strike at 15mph can unseat the bag or cause you to crash.
2. The “Strap Tuck” Discipline
If your bag uses a zippered pocket for the backpack straps (like the Arkel or Rhinowalk), you must develop a strict mental checklist before riding. A loose backpack strap that drops into your rear spokes will lock your rear wheel instantly, throwing you over the handlebars. Pro-Tip: I use a small carabiner to clip both backpack straps together inside the zipper pouch. Even if the zipper fails, the straps are tethered together and cannot reach the wheel.
3. Hardware Lubrication (Year One Maintenance)
Locking hardware mechanisms (like Klickfix or Ortlieb’s QL systems) are exposed to road grit, salt, and water. Every 6 months, apply a single drop of dry bicycle chain lube (Teflon-based) to the springs of the latching hooks. This prevents the plastic parts from binding and ensures the bag releases instantly when you pull the handle.
❌ Common Mistakes When Buying a Convertible Bag
When transitioning from a standard backpack to a rack-mounted system, buyers often make several costly errors.
Mistake 1: Ignoring Rack Gauge Compatibility
Not all bike racks are created equal. Some heavy-duty touring racks or e-bike racks use thick 14mm to 16mm tubing. Many budget panniers only have hooks designed for standard 8mm to 10mm tubes. If you try to force a small hook onto a thick rack, the plastic will suffer micro-fractures and eventually snap under load. Always measure your rack’s tubing diameter before purchasing, or buy a bag with adjustable hardware like the Klickfix system.
Mistake 2: Overestimating “Water Resistant” Labels
“Water-resistant” means the fabric will stop a light drizzle for 10 minutes. “Waterproof” (specifically IPX4 or higher) means it can withstand sustained downpours. If you live in an area with unpredictable weather, do not trust a water-resistant bag without an included rain cover. What most buyers overlook is the zippers; a waterproof bag with non-sealed zippers will still flood your laptop compartment.
Mistake 3: Prioritizing Capacity Over Shape
A 30L bag sounds great until you realize it’s shaped like a giant box that acts as a parachute on windy days. Wide bags also drastically increase the chance of heel strike. Look for taller, narrower designs (like the Thule Shield) rather than wide, boxy ones.
🧭 How to Choose a pannier to backpack
If you are still on the fence, use this expert decision-making framework to narrow down your choices:
-
Assess Your Rack Hardware: Does your bike have a standard rear rack, a heavy-duty e-bike rack, or no rack at all? If you have an e-bike with an integrated thick rack, you absolutely need a premium mounting system (Ortlieb or Two Wheel Gear) that can adapt to thick tubing.
-
Calculate Your Load Density: Are you carrying bulky, lightweight items (gym clothes, puffy jacket) or small, dense items (textbooks, tools, large laptops)? Dense items require rigid back panels so the bag doesn’t sag into the wheel. The Arkel Bug excels here.
-
Analyze the Off-Bike Experience: How far do you walk after locking up? If it’s just from the bike rack to the elevator, a basic conversion system is fine. If you use it as a daypack for a 3-mile hike across a university campus, prioritize bags with padded, ergonomic shoulder straps and a sternum strap.
-
Determine the Climate Reality: Be honest about your riding habits. If you refuse to ride in the rain, don’t spend an extra $80 for extreme IP64 waterproofing. A basic 600D polyester bag with a rain cover will suffice.
💰 Long-Term Cost & Maintenance of Commuter Bags
Let’s talk about the Total Cost of Ownership (TCO). A common mistake is buying a cheap $40 off-brand bag, only to have the plastic mounting hooks snap on a cold winter morning. Because budget brands rarely sell replacement parts, that $40 bag goes straight into the landfill, and you have to buy another one.
In contrast, brands like Ortlieb, Arkel, and Two Wheel Gear operate on a sustainable, modular model. The spec sheet won’t tell you this, but nearly every screw, hook, and rail on the premium bags can be purchased separately for under $10.
In my experience, a $180 bag that lasts 8 years (with perhaps a $10 hook replacement in year 4) is drastically cheaper—and better for the environment—than buying four $50 bags over the same period. For more insights on the environmental impact of durable cycling gear, I highly recommend reading up on sustainable practices at the League of American Bicyclists or checking out repair resources from iFixit.
Furthermore, consider the cost of what is inside the bag. A snapped bungee cord on a cheap bag might result in your $2,000 laptop bouncing down the asphalt. When you reframe the purchase as “insurance for my electronics,” the premium locking hardware becomes very easy to justify.
🔍 Features That Actually Matter (And Those That Don’t)
Marketing departments love to invent proprietary terms for standard features. Here is how you filter the noise:
Features That Actually Matter:
-
Rigid Back Panel: This is non-negotiable. If the bag does not have a stiff plastic or aluminum backboard, it will eventually warp and rub against your spokes.
-
Replaceable Mounting Hardware: As mentioned above, hardware breaks. Being able to unscrew and replace a hook is a lifesaver.
-
High-Visibility Elements: A black bag at night is practically invisible. Look for bags with integrated reflective threading or large reflective patches on the sides and rear.
Features That Don’t Matter (As Much):
-
Excessive External Pockets: While they look cool, external mesh pockets get coated in road dirt and exhaust grime. Anything you put in them (like a water bottle) will be filthy by the time you reach the office.
-
“Universal” Fit Claims: There is no such thing. Every rack geometry is different. Always look for adjustable hardware rather than “one size fits all” promises.
✨ Don’t Miss These Exclusive Deals!
🔍 Upgrade your commute today. Click on any highlighted item to check current pricing and availability. These tools will help you arrive at your destination dry, comfortable, and looking professional!
🏁 Conclusion: Making the Final Choice
Transitioning to a pannier to backpack is a watershed moment for any daily commuter. It bridges the gap between the utilitarian reality of cycling and the professional requirements of modern office life.
If you want a flawless balance of aesthetics, ease of use, and professional organization, the Two Wheel Gear 2.0 is my top recommendation. If you wage war against the weather gods daily, invest in the Ortlieb Vario PS. And if you are just starting out and need to protect your wallet while upgrading your commute, the Rhinowalk Bike Bag provides incredible utility for the price.
Remember, the goal is not to buy the most expensive gear; the goal is to buy the gear that removes the friction from your morning routine. A good convertible bag doesn’t just carry your laptop—it encourages you to ride your bike more often, and that is a return on investment you can’t put a price on.
❓ Frequently Asked Questions
❓ What is the main advantage of a pannier to backpack over a regular cycling backpack?
✅ The primary advantage is eliminating back sweat and reducing physical fatigue. By shifting the weight from your spine to the bicycle frame, you lower your center of gravity, making the ride more comfortable while arriving at your destination dry and professional…
❓ Can a convertible bag cause my bike to tip over?
✅ Yes, if packed unevenly. A heavily loaded pannier placed on only one side of the bike alters the balance. When using a single kickstand, the bike may tip toward the heavy side. Always lean the bike carefully or invest in a dual-leg center kickstand…
❓ Do I need a special rack for a pannier to backpack?
✅ Not necessarily, but you need a rack with proper clearance. Standard rear cargo racks work perfectly. However, ensure the rack has a lower side rail (a “dog leg”) to prevent the bottom of the bag from swinging into your wheel spokes…
❓ How long does it take to convert the bag?
✅ It depends entirely on the design. Modern flip-panel designs or roll-away covers (like the Ortlieb Vario PS or Two Wheel Gear) take about 10 to 15 seconds. Older tuck-away strap designs can take up to a minute…
❓ Are convertible panniers safe for carrying laptops?
✅ Yes, provided the bag has a suspended, padded laptop sleeve and secure locking rack hardware. A suspended sleeve prevents the laptop from hitting the ground when you set the bag down. Quality rack hardware prevents road vibrations from damaging the hard drive…
📖 Recommended for You
- 5 Best Electric Bike Bags for 2026: Stop Overloading Your Back!
- seatpost bags for bicycles: 7 Best Durable Picks for Smart Riders in 2026
- 5 Best bicycle rear bag Options for Your 2026 Cycling Adventures
Disclaimer: This article contains affiliate links. As an Amazon Associate, I earn from qualifying purchases. If you purchase products through these links, we may earn a small commission at no additional cost to you.
✨ Found this helpful? Share it with your friends! 💬🤗
[addtoany]