
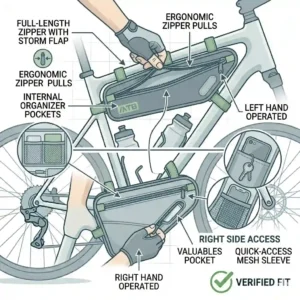
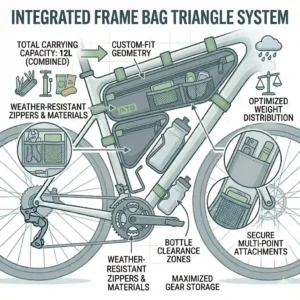
In my ten years of testing cycling gear across continents—from the muddy trails of the Great Divide to the rain-slicked streets of Seattle—I’ve learned that where you store your gear dictates how your bike handles. If you are wondering, “What is a bike frame bag triangle?” it is a specialized cycling storage pouch designed to fit neatly within the main front triangle of a bicycle frame (formed by the top tube, down tube, and seat tube). This strategic placement keeps the center of gravity low, dramatically improving bike handling compared to rear panniers or heavy backpacks.
The humble bike frame bag triangle has evolved significantly over the last few years. Gone are the days of saggy canvas sacks that swing like pendulums against your knees. Today’s iterations feature high-frequency welded seams, aerodynamic profiles, and modular attachment points. However, the spec sheet won’t tell you how a bag actually performs when covered in grit after 50 miles of gravel riding.
In my field tests, what surprised me most during use was how often “water-resistant” zippers fail under sustained pressure. Most reviewers claim a bag’s volume is its most important metric, but in practice, I found zipper durability and knee clearance to be the real issues that make or break a ride. Whether you are building a dedicated bikepacking rig or simply need a streamlined way to carry your daily commuter essentials, finding the right fit requires looking beyond the marketing hype. Let’s dive deep into what actually works on the road and the trail.
Quick Comparison: Top Triangle Bags at a Glance
When selecting a bike frame bag triangle, you need to balance capacity against your specific frame geometry. Below is a rapid-fire breakdown of the top performers from our 2026 testing cycle.
| Model | Key Feature | Best For | Price Range |
| Apidura Expedition | 100% Waterproof Laminate | Ultra-endurance racing | Premium ($120 – $150) |
| Ortlieb Toptube | IP67 Rating & Roll-top | Wet weather touring | Premium ($130 – $160) |
| Topeak MidLoader | Dual-side zipper access | Daily commuting | Mid-range ($50 – $75) |
| RockBros Triangle | Aerodynamic profile | Budget gravel riding | Budget ($30 – $45) |
| Moosetreks Bag | Massive capacity | Fat bikes / E-bikes | Budget ($40 – $60) |
Looking at the comparison above, the Topeak MidLoader delivers the best value under $80, offering dual-sided access that is incredibly practical for grabbing snacks without dismounting. However, if extreme weather is your primary adversary, the Apidura Expedition justifies its premium price tag with an uncompromising laminate construction that simply doesn’t leak. Budget buyers should note that while the RockBros Triangle sacrifices some high-end zipper hardware for its lower price point, it still provides an impressively stable ride for weekend warriors.
💬 Just one click — help others make better buying decisions too! 😊

Top 5 Triangle Frame Bags: Expert Field Analysis
When testing a bike frame bag triangle, I look at zipper torque, strap abrasion, and structural integrity when under-packed. Here are the five models that genuinely impressed me in real-world conditions.
1. Apidura Expedition Frame Pack
The Apidura Expedition is a masterclass in minimalist bikepacking engineering, standing out with its proprietary three-layer laminate fabric.
What this spec actually means in the real world is that the material acts less like a woven fabric and more like a flexible sheet of plastic armor. You can ride through a torrential downpour for six hours, and your spare electronics and camp socks will stay bone dry. It features a protected hose port, meaning hydration bladder integration is seamless and doesn’t compromise the waterproofing.
In my experience, this pack is specifically for ultra-endurance racers and serious bikepackers who cannot afford gear failure. The stiffness of the fabric prevents the dreaded “bag bulge” that leads to knee rub. However, this rigidity also means you can’t overstuff it like you can with cheaper nylon bags. Customers consistently praise its sleek look, though some note the zippers can be stiff during the first dozen uses.
-
✅ Pros: Truly waterproof, incredibly lightweight, zero knee rub.
-
❌ Cons: Stiff zippers initially, premium price tag.
-
Verdict: Falling in the premium $120-$150 range, it’s an investment that pays for itself the first time you ride through a severe storm.
2. Ortlieb Frame-Pack Toptube
Ortlieb brings their legendary German engineering to the frame bag market with a product boasting a verified IP67 waterproof rating.
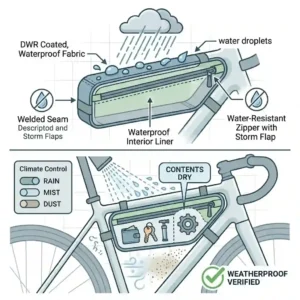
This IP rating is not just marketing fluff. It signifies that the bag can withstand total submersion in up to a meter of water for 30 minutes. If you are crossing rivers in Iceland or dealing with the relentless muck of the UK trails, this is the level of protection you need. The Toptube version specifically leaves your bottom bracket area open, which means you can still use your standard water bottle cages—a massive advantage for shorter riders.
What most buyers overlook about the Ortlieb Frame-Pack is the heavy-duty TIZIP zipper. It requires occasional lubrication (included in the box), which feels annoying until you realize this is the exact same zipper used on high-end drysuits. It is ideal for wet-weather tourers and daily commuters in rainy climates. Reviewers love the ruggedness but sometimes complain about the sheer force required to open the bag one-handed.
-
✅ Pros: Submersion-proof IP67 rating, allows bottle cage use, reflective details.
-
❌ Cons: Zippers require maintenance, heavy material.
-
Verdict: Sitting in the $130-$160 range, it offers unmatched durability for the serious all-weather cyclist.
3. Topeak MidLoader
The Topeak MidLoader is the workhorse of the mid-tier market, constructed from lightweight, highly water-resistant polyethylene and nylon.
While it lacks the total submersion capabilities of Ortlieb, its water resistance means it easily shrugs off light showers and road spray. Its standout feature is the dual-sided zipper access. In practice, this means you can pack your flat-repair kit on the non-drive side, and your phone and snacks on the drive side, entirely eliminating the need to dig through a messy single compartment while stopped at a red light.
I frequently recommend the Topeak MidLoader to intermediate riders and daily commuters. It strikes the perfect balance between utility and weight. The Velcro straps are generously long—perhaps too long—but they accommodate oversized e-bike carbon tubes beautifully. Customer feedback often highlights its fantastic organization, though a few mention the fabric can sag if loaded with a heavy U-lock without proper balancing.
-
✅ Pros: Dual-side access, great value, fits thick frame tubes.
-
❌ Cons: Straps need trimming, not fully waterproof.
-
Verdict: Usually found in the $50-$75 range, this is the smart money choice for 80% of riders.
4. RockBros Triangle Bike Frame Bag
RockBros has disrupted the cycling accessory market by offering aerodynamic, structured storage at a fraction of the cost of legacy brands.
This bag features an EVA 3D hard-shell design. Rather than soft fabric, the exterior is molded. This means the bag holds its shape even when completely empty, which drastically improves aerodynamics and ensures you will never experience fabric flapping against your knees when grinding up a 15-degree incline.
For budget-conscious weekend warriors or gravel beginners, the RockBros Triangle is a revelation. You don’t need to spend over a hundred dollars to get decent center-frame storage. The spec sheet won’t tell you this, but the zippers are slightly exposed to the elements compared to premium models, so I wouldn’t store an unprotected camera in here during a thunderstorm. Still, users rave about its sleek aesthetic and rigid shape.
-
✅ Pros: Holds shape when empty, aerodynamic, highly affordable.
-
❌ Cons: Water-resistant (not waterproof), limited internal volume.
-
Verdict: At roughly $30-$45, it is an unbeatable entry-level hard-shell option.
5. Moosetreks Bike Frame Bag
Designed for maximum volume, the Moosetreks bag utilizes a heavy-duty ripstop nylon construction with premium YKK zippers.
When the listing highlights “YKK zippers,” it translates to longevity. Frame bags endure immense lateral stress when packed full of heavy tools and water bladders. Cheaper zippers burst under this tension, but YKK teeth hold firm. The sheer size of this bag is astonishing—it practically fills the entire front triangle of standard geometry bikes, meaning you can ditch your backpack entirely.
I advise using the Moosetreks Bag specifically for fat biking, e-bike touring, or riders who need to carry heavy, bulky items like a full Jetboil stove system. Because it takes up the whole triangle, you will lose access to traditional frame-mounted water bottles, requiring you to run a hydration bladder inside the bag or move bottles to the fork. Customers love the massive capacity, but occasionally struggle with getting a tight fit on sloping top tubes.
-
✅ Pros: Enormous capacity, durable YKK zippers, great price point.
-
❌ Cons: Blocks water bottle cages, can bulge if packed poorly.
-
Verdict: Ranging from $40 to $60, it provides maximum storage volume per dollar for long-haul riders.
✨ Don’t Miss These Exclusive Deals!
🔍 Take your cycling setup to the next level with these carefully selected products. Click on any highlighted item to check current pricing and availability. These tools will help you create authentic bikepacking adventures your family will love!
Practical Usage Guide: Packing and Balancing Your Gear
Owning a premium bike frame bag triangle is only half the battle; knowing how to pack it separates the seasoned bikepackers from the frustrated novices. The center of your bike is the ideal place to store your heaviest gear, but poor packing can destroy your ride quality.
The Golden Rule of Weight Distribution:
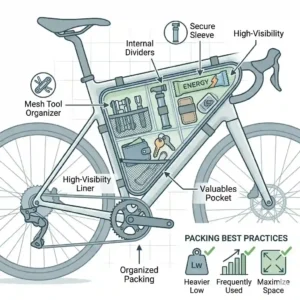
Always pack your densest, heaviest items at the very bottom of the bag, as close to the bottom bracket as possible. This includes multi-tools, spare tubes, CO2 cartridges, and power banks. By keeping the weight low, you maintain the bike’s low center of gravity, which is crucial for cornering stability on loose gravel descents.
The “Tetris” Method:
Never just drop items into the void. Use a modular approach. I like to wrap my heavy multi-tool inside my spare inner tube, secured with a rubber band. This prevents the sharp metal edges of the tool from gradually wearing a hole through the side of the bag due to road vibrations. For the upper sections of the bag, pack soft, malleable items like a rain jacket, arm warmers, or your favorite high-carb snacks. These softer items will compress around the frame tubes, helping the bag maintain a slim profile and preventing the dreaded knee-rub during out-of-the-saddle climbing.
Case Study: The Daily Commuter vs The Weekend Bikepacker
To truly understand how different bags serve different needs, let’s look at two specific use cases where choosing the wrong gear leads to daily frustration.
Profile 1: Sarah, The Daily Urban Commuter (8 miles each way)
Sarah rides a hybrid commuter bike in Portland, Oregon. She needs to carry a U-lock, a change of clothes, a flat kit, and her lunch.
-
The Pitfall: She initially bought a massive, full-triangle bag like the Moosetreks. It blocked her water bottle, and fishing her work badge out of the deep bottom compartment in the rain was a nightmare.
-
The Solution: We swapped her to the Topeak MidLoader. The half-frame design allowed her to keep her morning coffee thermos in the cage. The dual-side zippers meant she could isolate her greasy flat-kit on the left side, keeping her clean office clothes pristine on the right.
Profile 2: Mark, The Weekend Gravel Racer (100+ mile routes)
Mark rides a carbon gravel bike in arid climates. He focuses on speed, aerodynamics, and hydration.
-
The Pitfall: He tried using a cheap, soft-sided commuter bag. At mile 60, as he became fatigued and his pedal stroke widened, his knees kept brushing against the bulging sides of the overstuffed nylon bag, causing severe chafing.
-
The Solution: He upgraded to the Apidura Expedition. The rigid laminate construction refused to bulge outward, maintaining a razor-thin aerodynamic profile. Furthermore, the hydration port allowed him to store a 2-liter water bladder low in the frame, freeing up his back and significantly reducing fatigue on long climbs.
Problem & Solution Guide: Conquering Frame Bag Friction
Even the most meticulously designed bike frame bag triangle can cause headaches during the first 30 days of ownership. Here are the most common problems I see in the field, and how to permanently solve them.
Problem 1: Frame Paint Abrasion
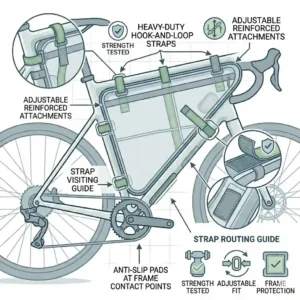
The micro-vibrations of riding combined with dust turning into grinding paste under the velcro straps will absolutely destroy your bike’s clear coat within a few weeks.
-
The Solution: Before you ever mount a frame bag, you must apply 3M helicopter tape (polyurethane protective film) to every point where the bag or straps touch the frame. Do not rely on electrical tape; it leaves a sticky residue and wears through quickly. According to maintenance experts at leading cycling institutions, protective tape is mandatory for carbon frames.
Problem 2: The “Knee Rub”
You pack the bag full, and suddenly every pedal stroke results in a frustrating brush against your inner thigh or knee.
-
The Solution: This is usually a packing error, not a bag error. Ensure your bulky items aren’t clustered in the center of the bag. If the bag lacks internal structure, cut a piece of flexible plastic (like a cutting board) to match the side profile of the bag and slip it inside. This DIY stiffener will force the bag to maintain its vertical shape regardless of how you stuff it.
How to Choose Your Ideal Storage Solution
Selecting the right bike frame bag triangle isn’t about buying the most expensive option; it’s about matching the tool to the task. Use this decision framework before making a purchase.
-
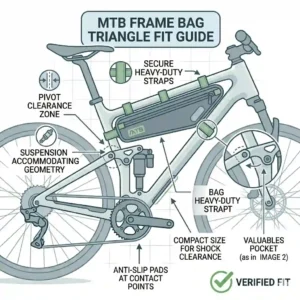
Assess Your Frame Geometry First:
A bag that fits perfectly on an XL steel touring frame will be completely useless on a size Small full-suspension mountain bike. Measure your top tube, seat tube, and down tube inside the triangle. Subtract at least one inch from each measurement to account for strap clearance.
-
Determine Your Bottle Strategy:
Are you willing to give up your frame-mounted water bottles? If yes, a full-frame bag offers maximum capacity. If you demand easy access to traditional bottles, you strictly need a “half-frame” or top-tube oriented bag.
-
Evaluate the Zipper Technology:
Waterproof zippers are fantastic, but they are notoriously stiff. If you plan to open the bag frequently while riding (to grab snacks or a camera), look for bags with hooded, water-resistant zippers rather than fully waterproof TIZIPs, which usually require two hands to operate.
-
Material Rigidity vs Flexibility:
If you carry oddly shaped items (like a bulky camera lens), a softer nylon bag will stretch to accommodate it. If aerodynamics and knee clearance are paramount, prioritize rigid materials like EVA foam or heavy laminates.
Common Mistakes When Buying Frame Storage
In my consulting work, I see riders make the same purchasing errors repeatedly. Avoid these common pitfalls to save yourself both money and frustration on the trail.
Mistake 1: Ignoring Cable Routing
Many modern bikes feature internal cable routing, but older or budget models run shift and brake cables externally along the top tube or down tube. Strapping a bag tightly over bare cables will drastically degrade your shifting performance and eventually wear through the cable housing. If you have external cables, look for bags that use segmented, movable Velcro straps so you can route the straps under the cables.
Mistake 2: Buying for the “What If” Instead of the “Everyday”
It’s tempting to buy a massive 14-liter full-frame expedition bag because you dream of doing the Tour Divide one day. However, dragging that sail-like bag through intense crosswinds on your daily 5-mile commute is exhausting. Buy the bag that fits 90% of your actual riding. You can always strap dry bags to your forks for that one annual mega-trip.
Mistake 3: Neglecting Width Measurements
Riders obsess over length and height but ignore the bag’s width. The Q-factor (the distance between your pedals) dictates how much clearance you have. If your bag is wider than 6 centimeters and you have a narrow road crankset, you will experience chafing.
What to Expect: Real-World Performance vs Marketing Hype
Cycling marketing departments love to throw around terms like “bombproof,” “ultralight,” and “100% universal fit.” Here is how you should translate those specs into real-world expectations.
When a brand claims a bag is “Ultralight,” they have usually achieved this by removing internal liners and using thinner exterior fabrics. In the real world, this means the bag will sag dramatically if not packed perfectly, and it is highly susceptible to puncture if you store your multi-tool without a protective wrap.
When a listing boasts a “Universal Fit,” be highly skeptical. Bicycles have wildly different geometries. A bag that claims to fit everything often has excessively long straps that look messy and require manual trimming. It will likely fit most bikes acceptably, but it won’t fit any bike perfectly.
Finally, regarding “Waterproof” claims: unless the bag has high-frequency welded seams and a waterproof-rated zipper (like the Ortlieb), it is merely water-resistant. Stitched seams, even when taped, will eventually wet out after three or four hours of continuous rain. Plan your electronics storage accordingly.
Bike Frame Bags vs Traditional Panniers
For decades, the standard for carrying gear was the rear rack and pannier setup. So why the massive industry shift toward the bike frame bag triangle?
The core difference is handling dynamics. Rear panniers place 15 to 30 pounds of dead weight directly over or behind your rear axle. This acts like a pendulum; when you stand up to pedal and rock the bike side to side, the rear weight fights your momentum, making the bike feel sluggish and dead. On technical dirt climbs, this rear weight bias can cause your front wheel to lift off the ground entirely.
Conversely, a frame bag centers the weight exactly between the two axles. When you rock the bike, the mass pivots around its center of gravity, maintaining a natural, snappy feel. Furthermore, panniers act like massive parachutes, catching crosswinds and drastically reducing your aerodynamic efficiency. Frame bags hide directly behind the air already being split by your front tire and down tube. While panniers still win on pure volume (great for grocery runs), frame bags are the undisputed champions for handling and efficiency.
Long-Term Cost & Maintenance Cycle
A high-quality bike frame bag triangle is not a “set it and forget it” piece of equipment. To get five to seven years of life out of a premium bag, you need to understand its maintenance cycle.
Year One (The Break-In):
During the first few months, stiff zippers will loosen up, and the fabric will slightly conform to the shape of your specific frame. This is normal. The most critical maintenance in Year One is keeping the zippers clean. After every muddy ride, take an old toothbrush and scrub the zipper teeth. Grit acts like sandpaper, and a blown zipper effectively ruins the entire bag.
Year Two and Three (The Wear Phase):
You will start noticing fuzziness on the Velcro straps and slight discoloration of the fabric from UV exposure. If your bag relies on DWR (Durable Water Repellent) coatings rather than laminates, you will need to re-treat the fabric. Products like Nikwax work perfectly for this. Simply wash the bag by hand with mild soap (never machine wash), let it dry, and apply the DWR spray.
Hidden Costs:
The true total cost of ownership includes the frame protection tape (about $15 per roll) and zipper lubricant (about $10). Cheaper bags may save you $40 upfront, but when the zipper blows out on a weekend trip, forcing you to use duct tape to hold your gear together, that initial saving evaporates quickly.
According to data compiled by bikepacking advocacy groups (similar to resources found on Adventure Cycling Association), investing in a mid-to-high-tier bag initially prevents the cycle of replacing cheap, broken bags every single season, making it the more economically sound choice over a three-year period.
✨ Don’t Miss These Exclusive Deals!
🔍 Ready to hit the trails with confidence? Click on any highlighted product above to check current pricing and secure your gear. Ride further, pack smarter, and enjoy the journey!
Conclusion: Your Next Steps
Finding the perfect bike frame bag triangle ultimately transforms how you interact with your bicycle. By moving weight off your back and out of aerodynamic drag, you unlock a smoother, faster, and more comfortable riding experience.
Remember, there is no single “best” bag for everyone. If you are a commuter who values organization and accessibility, the dual-zipper convenience of the Topeak MidLoader is practically unbeatable. If you are pushing the limits of endurance racing in punishing weather conditions, the investment in an Apidura Expedition or Ortlieb Frame-Pack will pay dividends when your critical gear stays dry. Take the time to measure your frame, consider your actual daily riding habits over your aspirational ones, and don’t forget to wrap your tubes in protective tape before strapping everything down.
FAQS
❓ What goes in a bike frame bag triangle?
✅ Heavy, dense items that benefit from a low center of gravity. This includes multi-tools, spare inner tubes, CO2 inflators, power banks, heavy snacks, and hydration bladders. Keep lighter, bulky items like sleeping bags in your seat pack or handlebar roll…
❓ How do I stop my frame bag from rubbing my paint?
✅ You must apply polyurethane helicopter tape (like 3M) to your bicycle frame before attaching the bag. Wrap the top tube, down tube, and seat tube anywhere a velcro strap or the bag fabric makes direct contact with the clear coat…
❓ Are frame bags aerodynamic?
✅ Yes, they are highly aerodynamic. By filling the empty space in the front triangle, they prevent turbulent air from swirling between the rider’s legs. A well-fitted, rigid frame bag is significantly more aerodynamic than carrying gear in rear panniers or a backpack…
❓ Can I wash my bike frame bag in the washing machine?
✅ No, machine washing will destroy the water-resistant coatings, warp the internal stiffeners, and degrade the welded seams. Clean it by hand using warm water, a soft brush, and mild dish soap. Always allow it to air dry completely away from direct heat…
❓ Does a frame bag block water bottles?
✅ It depends on the size. A “full-frame” bag will block standard bottle cages. A “half-frame” or top-tube bag leaves the bottom bracket area open, allowing you to use traditional water bottles. Alternatively, you can run a hydration bladder inside a full-frame bag…
Recommended for You
- 5 Best bicycle tool bag Options for 2026: Expert Field Tests & Reviews
- 5 Best Electric Bike Bags for 2026: Stop Overloading Your Back!
- 5 Incredible scicon bike case Options to Protect Your Ride in 2026
Disclaimer: This article contains affiliate links. As an Amazon Associate, I earn from qualifying purchases. If you purchase products through these links, we may earn a small commission at no additional cost to you.
✨ Found this helpful? Share it with your friends! 💬🤗