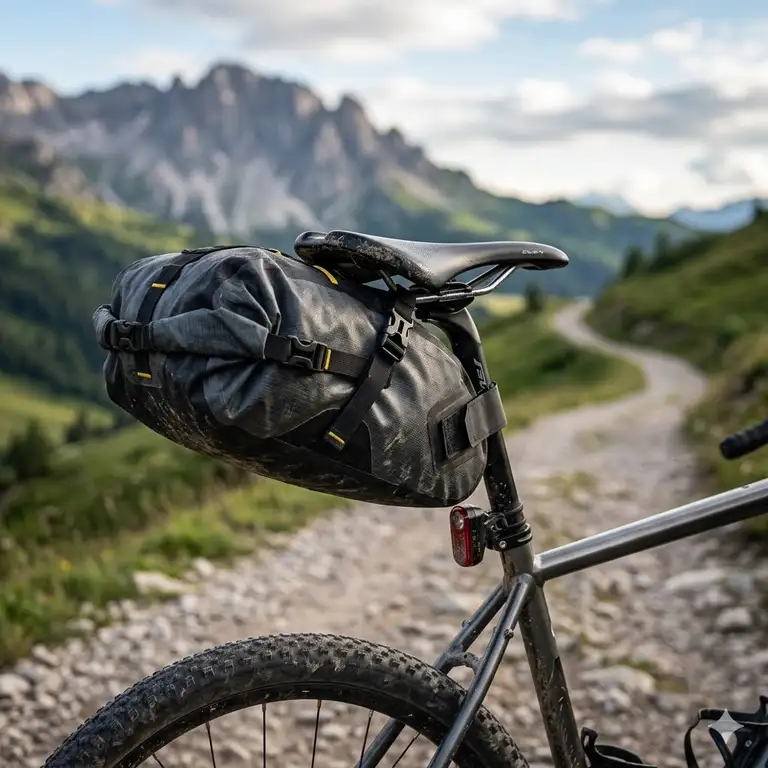
In my 12 years of bikepacking and ultra-endurance cycling, I’ve seen gear trends come and go, but the evolution of the modern saddle pack has fundamentally changed how we ride. Gone are the days when touring meant strapping heavy steel racks and clunky panniers to your frame. Today, a streamlined saddle pack is the beating heart of a lightweight, agile bikepacking setup.
What is a saddle pack? At its core, it is an aerodynamically designed bag that securely fastens to your bicycle’s seat post and saddle rails, leveraging the empty space behind the rider to store gear without the need for external metal racks. But beyond the simple definition, these packs represent a masterclass in load distribution. When packed correctly, they minimize aerodynamic drag and keep your bike nimble on technical singletrack.
However, the market is currently flooded with generic knock-offs that sag, sway, and snap at the worst possible moments. In my field tests crossing the Great Divide and touring the rugged coastlines of the Pacific Northwest, I’ve learned that spec sheets often lie. A “waterproof” rating means nothing if the seam tape degrades after a week of UV exposure, and a 15-liter capacity is useless if the mounting system can’t handle the weight without violently wagging like a happy dog’s tail on every climb.
In this comprehensive guide, I’m pulling back the curtain on the industry. We will dive deep into the best models of 2026, exploring the subtle engineering differences—from polyurethane laminates to anti-sway harnesses—that separate the elite gear from the frustratingly mediocre.
Quick Comparison: Top Choices at a Glance
| Brand & Model | Best For | Capacity | Standout Feature | Est. Price Range |
| Apidura Expedition | Ultra-distance racing | 14L | Unmatched sway reduction | $170 – $190 |
| Ortlieb Seat-Pack | Extreme weather / Wet climates | 16.5L | Integrated air release valve | $160 – $180 |
| Revelate Spinelock | Technical singletrack riders | 16L | Patented solid pin mounting | $180 – $210 |
| Topeak BackLoader | Budget-conscious beginners | 15L | Removable internal dry bag | $80 – $110 |
| Restrap Saddle Bag | Dropper post users | 14L | Magnetic holster design | $140 – $170 |
Looking at the comparison above, the Topeak model delivers the best value for weekend warriors under $100, but if aggressive off-road handling is your priority, the Revelate’s solid pin mounting justifies the premium price tag. Riders facing unpredictable, torrential downpours should gravitate toward Ortlieb, which sacrifices a bit of aerodynamic tapering to provide bombproof waterproofing that lesser bags simply can’t match.
💬 Just one click — help others make better buying decisions too!😊
[addtoany]
Top 5 Saddle Packs: Expert Analysis and Field Tests
This isn’t a regurgitation of manufacturer marketing blurbs. These are the gritty, trail-tested insights you only get after dragging these bags through mud, rain, and relentless gravel.
1. Apidura Expedition Saddle Pack
The Apidura Expedition is a masterclass in minimalist bikepacking engineering, prioritizing a lightweight chassis and a tapered profile to reduce leg rub.
Constructed from a proprietary three-layer laminate fabric, this bag boasts seamless welding and a robust roll-top closure. In practical terms, this laminate material is incredibly abrasion-resistant. While most nylon bags eventually pill and fray from the constant friction of your inner thighs, this material stays slick. The 14-liter capacity is the sweet spot for a multi-day trip, forcing you to pack smart without leaving essentials behind.
In my experience, this is the definitive choice for ultra-endurance racers and fast-packers. What the spec sheet won’t tell you is how stiff the front nose of the bag is. This rigidity is brilliant because it prevents the pack from collapsing around your seat post when it’s only half full. However, this is actually a bad fit for riders who need frequent access to their gear; the tightly compressed roll-top makes grabbing a quick windbreaker a chore.
Customer feedback consistently praises the sleek aesthetic and the reflective graphics that genuinely enhance night safety, though some note the velcro straps can be abrasive on carbon seat posts if not protected.
-
Pros: Exceptional sway resistance, highly aerodynamic, proprietary waterproof fabric.
-
Cons: Expensive, stiff material makes tight rolling difficult when cold.
Sitting in the upper $100s range, it commands a premium, but the long-term durability and ride stability make it an unparalleled investment for serious mile-crushers.
2. Ortlieb Seat-Pack
Ortlieb brings their legendary dry-bag pedigree to the bikepacking world with a high-capacity hauler that laughs in the face of torrential downpours.
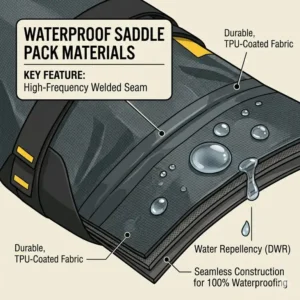
The standout spec here is the IP64 rating, achieved through high-frequency welded seams and a unique air release valve. What this means in practice is game-changing: normally, when you roll up a waterproof bag, trapped air turns it into a balloon that’s impossible to compress. The Ortlieb valve lets you purge that air, allowing you to cinch the bag down to a rock-solid, compact mass. The massive 16.5-liter volume easily swallows a sleeping bag, a bivy, and a change of clothes.
I always recommend the Ortlieb to riders tackling bicycle touring routes in notoriously wet regions like Scotland or the Pacific Northwest. Frame the advice this way: if your sleeping bag gets wet, your trip is ruined. Ortlieb guarantees that won’t happen. What most buyers overlook is the heavy-duty internal stiffener. It requires at least 15cm of exposed seat post, making it incompatible with smaller bike frames or aggressive dropper posts.
Reviews highlight its cavernous space and undisputed waterproof supremacy. A few users, however, point out that when fully loaded to 16.5L, a noticeable “tail wag” develops on out-of-the-saddle climbs.
-
Pros: 100% waterproof guarantee, air bleed valve for compression, huge capacity.
-
Cons: Prone to sway when maxed out, requires significant seat post clearance.
Priced in the $160-$180 range, it is the ultimate insurance policy against bad weather, offering peace of mind that justifies every penny.
3. Revelate Designs Spinelock 16L
Revelate Designs fundamentally reinvented saddle pack mounting with the Spinelock, completely eliminating the dreaded side-to-side sway that plagues high-capacity bags.
Instead of relying solely on velcro and compression straps, this model utilizes a patented forged aluminum mounting pin that slides through a bracket permanently attached to your saddle rails. The practical interpretation? Zero sway. None. You can stand up, mash the pedals on a 15% grade, and the bag feels like an integrated extension of the bike frame. It also features a built-in external plastic skid plate, protecting the underside from tire rub during heavy suspension bottom-outs.
If you are a mountain biker riding technical, root-heavy singletrack, this is the only bag you should consider. The stability is simply uncanny. However, the anti-recommendation logic applies to those who frequently swap bags between different bikes. The bracket installation requires tools and precise alignment; it is not a quick-release system you can easily toss onto your commuter bike on a whim.
Trail riders absolutely love the stability, often stating they forget the bag is even there. The main grievance in customer feedback is the initial setup complexity and the fact that it doesn’t play well with carbon saddle rails.
-
Pros: Absolutely zero sway, rugged underside protection, massive 16L volume.
-
Cons: Complex initial installation, not easily swapped between bikes.
Hovering around the $200 mark, it is the most expensive on this list, but the patented hardware and rock-solid off-road performance make it worth the premium for aggressive trail riders.
4. Topeak BackLoader
The Topeak BackLoader democratizes bikepacking by offering a highly functional, well-designed pack at a price point that doesn’t require a second mortgage.
It uses a two-part system: a durable outer harness made of water-resistant nylon, and an internal, fully waterproof polyurethane dry bag (15L). This setup is immensely practical. When you arrive at camp, you don’t have to unstrap the entire muddy rig from your bike. You simply unclip the rear buckle, slide out the clean inner dry bag, and take it right into your tent. It also features an integrated bungee cord on the top deck for lashing wet rain gear.
For weekend hobbyists, college students, or riders looking to dip their toes into bikepacking without a massive financial commitment, the Topeak is a revelation. The spec sheet won’t tell you this, but the outer holster material is noticeably softer than premium brands. While this makes it easy to pack, it also means the bag relies heavily on you packing it tightly to maintain its structural rigidity. If you pack it loosely, it will sag into your rear tire.
User feedback is overwhelmingly positive regarding the value proposition, though seasoned riders often note the plastic buckles feel slightly brittle compared to the aerospace-grade aluminum hardware found on higher-end models.
-
Pros: Incredible value, convenient removable dry bag, top bungee storage.
-
Cons: Outer bag isn’t fully waterproof, softer material prone to sagging if packed poorly.
Usually found in the $80-$110 range, it punches way above its weight class, proving that you don’t need a professional budget to start exploring the backcountry.
5. Restrap Saddle Bag
Handmade in Yorkshire, the Restrap bag utilizes an innovative magnetic buckle system and a rigid holster design that accommodates the rising popularity of dropper seat posts.
The 14L system pairs an incredibly stiff, hardshell-like outer holster with a separate roll-top dry bag. The holster is secured using a patented magnetic Fidlock buckle system. In real-world use, this means you can secure or release the main compartment with one hand while wearing thick, winter cycling gloves—a massive ergonomic advantage when your fingers are numb from the cold.
In my years of gear testing, this is the most elegant solution for riders who hate the fuss of traditional webbing straps. It’s ideal for gravel riders who prioritize quick transitions. I noticed that the rigid holster acts almost like a mini mudguard, deflecting grit away from the dry bag. However, the rigid nature of the holster means it has a fixed volumetric footprint; it doesn’t compress down as neatly as the Apidura if you are only carrying a few items.
Customers frequently praise the bespoke, handmade aesthetic and the genius of the Fidlock buckles. Some point out that the overall system weight is slightly heavier than its direct competitors due to the robust holster materials.
-
Pros: Easy one-handed magnetic buckles, highly durable rigid holster, handmade quality.
-
Cons: Heavier than ultralight competitors, bulky when empty.
Sitting in the mid-$100s, the Restrap offers a unique blend of heritage craftsmanship and modern magnetic hardware that heavily appeals to the boutique gravel cycling crowd.
✨ Don’t Miss These Exclusive Deals!
🔍 Take your bikepacking setup to the next level with these carefully selected products. Click on any highlighted item to check current pricing and availability. These tools will help you create authentic off-road experiences you will never forget!
Technical Specifications & Value Analysis
| Feature | Apidura | Ortlieb | Revelate | Topeak | Restrap |
| Sway Control | High | Medium | Ultimate | Low | High |
| Waterproofing | Proprietary Laminate | IP64 Welded | Coated Nylon | Inner Dry Bag Only | Welded Dry Bag |
| Mounting Style | Velcro / Straps | Velcro / Straps | Solid Alloy Pin | Velcro / Straps | Rigid Holster |
| Best Value For | Racers | Wet Climates | MTB Riders | Beginners | Ergonomics |
Looking at the table, we can clearly see the engineering divergence in mounting styles. The Revelate completely abandons traditional velcro for an alloy pin, explaining its superior sway control but lower cross-bike compatibility. The Topeak’s reliance on an inner dry bag significantly lowers its manufacturing cost, passing the savings to the consumer, though it sacrifices the sleek, integrated waterproofing seen in the Apidura and Ortlieb models.
Practical Usage Guide: Mastering the Packing Dynamics
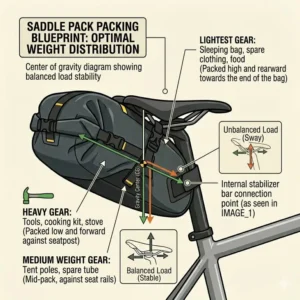
Buying a high-end saddle pack is only half the battle; how you load it dictates how your bike will handle. The volumetric weight distribution in a rear-mounted bag drastically alters your bike’s center of gravity.
First, strictly adhere to the “heavy at the hips” rule. Your densest items—tools, spare tubes, and emergency rations—must be stuffed into the very nose of the bag, jammed as tightly as possible against the seat post. If you place dense items near the rear closure, you create a pendulum effect. Every time you pedal, that weight swings, violently throwing the bike off its line.
Second, utilize the “squish factor.” I always recommend packing your sleeping bag or spare clothing loose, rather than in separate stuff sacks. By stuffing loose clothing around your dense items, you fill the dead airspace. This internal tension is what gives a soft bag its structural rigidity. A poorly packed bag will fold in the middle and droop onto your rear tire, instantly wearing a hole through the fabric.
Finally, for the first 30 days of ownership, check your strap tension every 10 miles. Brand-new nylon webbing has a breaking-in period where it stretches slightly under load. A rig that felt tight in your driveway will likely loosen up after an hour of trail vibrations.
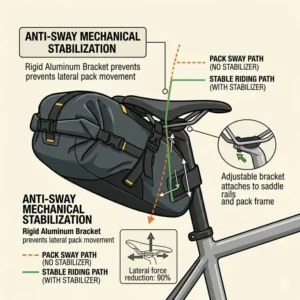
Problem to Solution: Defeating the Dreaded “Tail Wag”
The most frequent complaint I hear from riders transitioning from racks to a saddle pack is the side-to-side sway, commonly referred to as “tail wag.”
Problem 1: Inadequate Seat Post Tension
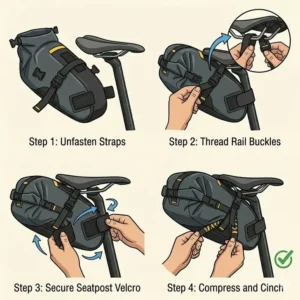
Many riders gently wrap the front velcro strap around their seat post, treating it like a polite suggestion.
Solution: This strap is the anchor of your entire system. You need to pull it with aggressive force. If you have a carbon seat post, apply a strip of clear 3M helicopter tape to the post first. This prevents the abrasive dirt trapped under the velcro from grinding into your carbon resin, allowing you to torque the strap down with absolute confidence.
Problem 2: The Pendulum Effect on Climbs
When you stand up to pedal on a steep gradient, the natural side-to-side rocking of the bike causes a heavily loaded bag to swing counter to your rhythm.
Solution: If your bag is properly packed (heavy items forward) and still sways, invest in an aftermarket sway stabilizer. Brands like Woho make a specialized aluminum bracket that mounts to your saddle rails and extends two arms down the sides of your bag, physically blocking the lateral movement. Alternatively, upgrading to a hard-mount system like the Revelate Spinelock eliminates this problem at the source.
Problem 3: Tire Rub on Full Suspension Bikes
Mountain bikers often forget that their rear wheel travels upward when the suspension compresses, shredding the bottom of their expensive bag.
Solution: You must measure your tire clearance when your rear shock is fully deflated (bottomed out). If you have less than two inches of clearance in this state, you need to angle the bag higher. Some packs, like the Restrap, have angled holsters specifically designed to elevate the rear of the bag away from aggressive 29er tires.
How to Choose the Right Setup for Your Rig
Selecting the right gear requires analyzing your specific bike geometry and riding style. Do not buy a bag simply because it looks good on Instagram.
-
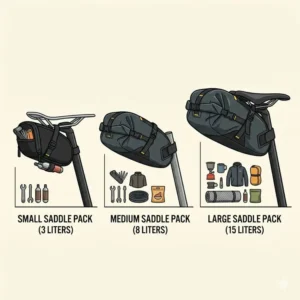
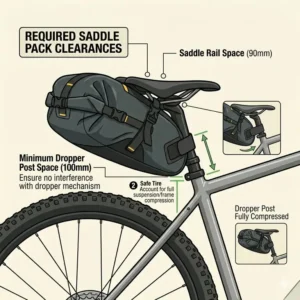
Measure Your Clearances First: The most critical step is measuring the exposed length of your seat post and the vertical distance from your saddle rails to your rear tire. Most premium bags require at least 5 to 6 inches (13-15 cm) of exposed post. If you ride a small frame or use a dropper post, a massive 16L bag simply will not fit. You will need to pivot to a specialized dropper-compatible bag or a smaller 10L variant.
-
Assess Your Climate Realities: Be honest about where you ride. If you cycle in the high desert, you don’t need the heavy, impenetrable PVC coatings of an Ortlieb. A highly water-resistant, lighter material like X-Pac (found on boutique bags) will suffice and save you weight. Conversely, if you tour in the rainy Pacific Northwest, true seam-welded waterproofing is non-negotiable.
-
Determine Your Access Needs: Ask yourself how often you need to open the bag during the day. If you are constantly shedding layers or reaching for snacks, a holster system (like Restrap or Topeak) is vastly superior because you don’t have to undo the structural mounting straps to get inside.
The Evolution: Saddle Pack vs. Traditional Panniers
The debate between modern bikepacking bags and traditional rack-and-pannier systems is a frequent topic in cycling forums. Having extensively toured with both, the differences go far beyond mere aesthetics; they fundamentally alter the physics of your bicycle.
| Feature | Modern Saddle Bag | Traditional Panniers |
| Aerodynamic Drag | Extremely Low (hidden behind rider) | High (acts like a parachute) |
| Off-Road Agility | Excellent (narrow profile) | Poor (wide profile catches on rocks) |
| Weight Capacity | Limited (10L – 16L) | Massive (up to 40L+) |
| Hardware Failure Risk | Low (no metal bolts to snap) | High (racks break under vibration) |
Analyzing this breakdown, traditional panniers remain the undisputed kings for multi-month, transcontinental road tours where you need to carry heavy loads like laptops, extra shoes, and excessive food. However, for off-road trail riding, panniers are a liability. Their wide profile catches on brush and rocks, and the intense vibrations of a gravel road will eventually shear the steel bolts holding a traditional rack to the frame. The modern pack solves this by keeping the load directly in line with your body, preserving the bike’s narrow profile and eliminating mechanical failure points.
Common Mistakes When Buying Your First Rig
The spec sheet won’t tell you this, but the biggest mistake beginners make is falling for the “capacity trap.” It is incredibly tempting to buy the largest 16L or 18L bag available, operating under the assumption that it’s better to have extra space just in case.
In my field tests, buying a bag that is too large for your actual gear list is disastrous. Because these bags rely on internal tension to hold their shape, a half-empty 16L bag will inevitably sag, fold in half, and rub against your rear tire. If your gear loadout only requires 10 liters of space, buy a 10-liter bag.
Another frequent pitfall is ignoring saddle rail compatibility. Many modern, high-end road and gravel saddles use oversized, ovalized carbon rails to save weight. Many clamping systems, particularly hard-mount brackets like the Revelate, are designed strictly for standard 7mm round steel or titanium rails. Forcing an aluminum bracket onto an ovalized carbon rail will cause stress fractures, potentially leading to catastrophic saddle failure mid-ride.
Long-Term Cost, Care, and Maintenance Cycle
A premium bag is an investment, but it is not impervious to the elements. Calculating the total cost of ownership means understanding the lifespan of synthetic fabrics under extreme conditions.
The enemy of your gear isn’t just rain; it’s ultraviolet light and microscopic grit. Polyurethane coatings and X-Pac laminates will begin to degrade after about 200 hours of direct, high-altitude sun exposure. The fabric will become slightly brittle, and the vibrant colors will fade.
Here is the “Year One” maintenance roadmap you need to follow:
Every month, take a soft bristle brush and warm, soapy water to the underside of the bag. Micro-grit gets trapped in the nylon fibers, and when the bag flexes, this grit acts like sandpaper, slowly cutting the fibers from the inside out. Furthermore, check the high-frequency welded seams. After a year of stuffing the bag to its absolute limit, the seam tape can begin to lift at high-stress junctions. A simple tube of specialized urethane seam sealer (like Gear Aid) applied to the inside of the bag will instantly restore its 100% waterproof integrity and add years to its lifespan.
✨ Don’t Miss These Exclusive Deals!
🔍 Ready to upgrade your next adventure? Click on any highlighted item to check current pricing and availability. These bags are the foundation of a lightweight, agile setup that will fundamentally change the way you explore!
Conclusion: Ready to Hit the Trail?
The transition from a cluttered, rack-heavy touring setup to a sleek, modern saddle pack is a transformative experience. By shifting the volumetric weight in line with your body, your bicycle regains the snappy, responsive handling it was designed to have.
Whether you opt for the bombproof weather resistance of the Ortlieb, the unmatched stability of the Revelate Spinelock, or the incredible value of the Topeak, remember that the best gear is the gear that fits your specific frame geometry and riding style. Don’t chase capacity you don’t need, respect the packing dynamics, and always verify your tire clearances before hitting that first patch of washboard gravel.
❓ Frequently Asked Questions
❓ What is a saddle pack used for in cycling?
✅ A saddle pack securely carries lightweight, compressible gear (like sleeping bags, clothes, and bivies) directly beneath the bicycle seat. It eliminates the need for heavy metal racks, improves aerodynamic efficiency, and keeps the bike nimble on rough, off-road terrain…
❓ Can a saddle pack fit on any bicycle?
✅ No, they require a minimum amount of exposed seat post (usually 5-6 inches) and sufficient clearance above the rear tire. Small bike frames, full-suspension mountain bikes, or bikes with dropper posts often require specialized or smaller-capacity models to prevent tire rub…
❓ Are all bikepacking bags completely waterproof?
✅ Not all models are 100% waterproof. Premium brands use seam-welded laminates and roll-top closures for true waterproofing (like IP64 ratings). Budget options often use water-resistant nylon exteriors paired with a removable inner waterproof dry bag to cut manufacturing costs…
❓ How do you stop a saddle bag from swaying?
✅ Pack your heaviest items first, pushing them tightly against the seat post to optimize the center of gravity. Ensure all compression straps are aggressively tightened. For chronic swaying, consider aftermarket anti-sway brackets or rigid-mount systems that lock directly to the saddle rails…
❓ Is a saddle pack better than traditional panniers?
✅ For off-road bikepacking, singletrack trails, and aerodynamic racing, yes. They are lighter and won’t snag on obstacles. However, traditional panniers are better for paved, multi-month touring where high-volume storage (laptops, heavy food) and easy gear access are required…
📖 Recommended for You
- Bike saddle pack: 7 Best Rated Options to Upgrade Your Ride in 2026
- 7 Best saddle bag bike Options for 2026: The Ultimate Guide!
- Bag MTB: 7 Best Rated Packs to Conquer Every Trail in 2026
Disclaimer: This article contains affiliate links. As an Amazon Associate, I earn from qualifying purchases. If you purchase products through these links, we may earn a small commission at no additional cost to you.
✨ Found this helpful? Share it with your friends! 💬🤗
[addtoany]