In my 10+ years of bikepacking, ultra-endurance racing, and daily commuting, I’ve learned that the space behind your stem is the most valuable real estate on a bicycle. A decade ago, we were strapping clunky, swaying nylon pouches to our frames that inevitably chafed our knees and ruined our paint jobs. Today, the market has evolved. The modern cockpit bag is a highly engineered piece of gear, often utilizing laser-cut Hypalon, high-frequency welded seams, and magnetic closures.
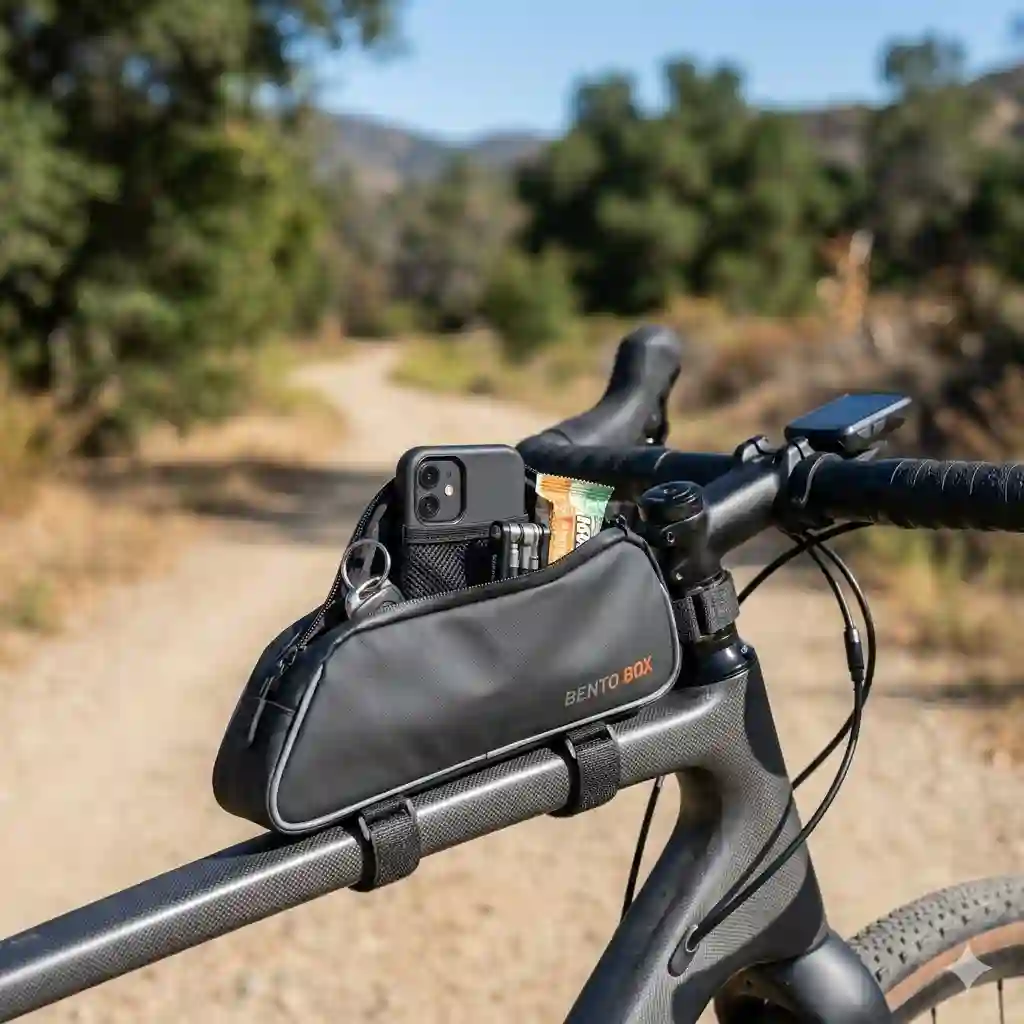
But what is a top tube bag? Simply put, it’s a small, accessible storage compartment that mounts to your bicycle’s top tube—either via velcro straps or direct bolt-on mounts—resting flush against the steerer tube or seat post. It’s designed to hold items you need while moving: nutrition, a smartphone, electrolytes, or a multi-tool.
In my field tests, spanning everything from the muddy tracks of the Tour Divide to rainy Seattle commutes, I’ve realized that the best top tube bag isn’t necessarily the one with the highest capacity. It’s the one that you don’t notice until you need it. The spec sheet won’t tell you how a zipper behaves when it’s caked in gritty mud, or how a bag sways when you’re out of the saddle grinding up a 15% gradient. That’s what this guide is for. I’ve tested dozens of models to break down exactly which bags work, which ones fail in the real world, and what features you actually need to look for in 2026.
📊 Quick Comparison: Top Contenders at a Glance
Before we dive into the granular details of each bag, let’s look at how the top contenders stack up. I’ve categorized these based on the primary riding disciplines they serve best.
| Model | Mount Type | Capacity | Water Resistance | Best For | Price Range |
| Revelate Designs Mag-Tank | Strap / Bolt-on | 1.0L | Highly Water-Resistant | Ultra-endurance racing | Mid $50s – $60s |
| Apidura Expedition | Bolt-on / Strap | 1.0L / 1.5L | 100% Waterproof | Wet-weather touring | High $70s – $80s |
| Topeak Fuel Tank | Strap | 0.5L / 0.75L | Water-Resistant | Daily commuting | Mid $40s – $50s |
| Restrap Top Tube Bag | Strap / Bolt-on | 0.8L | 100% Waterproof | Gravel riding | Mid $60s – $70s |
| RockBros Bike Bag | Strap | 1.0L | Water-Resistant | Budget/Entry-level | Low $10s – $20s |
Looking at the comparison above, the Apidura Expedition delivers the absolute best weather protection under $100, but if one-handed access is your priority, the Revelate Designs Mag-Tank’s magnetic closure justifies sacrificing a bit of absolute waterproofing. Budget buyers should note that the RockBros sacrifices zipper longevity and absolute stability for its highly attractive entry-level price point, making it great for casual weekends but risky for multi-day expeditions.
💬 Just one click — help others make better buying decisions too! 😊
[addtoany]
🏆 Top 5 best top tube bag Models: Expert Analysis
Finding the right bag requires looking past the marketing fluff. Here is my first-hand analysis of the top performers in the current market.
1. Revelate Designs Mag-Tank: The One-Handed Wonder
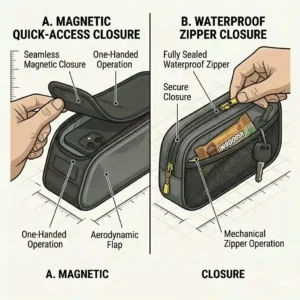
The Revelate Designs Mag-Tank stands out primarily for its proprietary magnetic buckle closure system, abandoning the traditional zipper entirely.
Constructed with RevX-PAC fabric and featuring a 1.0L capacity, this bag measures out to hold roughly four energy bars, a standard multi-tool, and a modern smartphone. What this means in practice is that you can blindly reach down, flick the bungee loop, grab a gel, and let the flap snap magnetically shut behind your hand without ever taking your eyes off the trail. Most reviewers praise its accessibility, but in my experience, the real advantage is durability; zippers are almost always the first point of failure in muddy conditions, and the Mag-Tank completely bypasses this fatal flaw.
In my opinion, this is the premier choice for gravel racers and ultra-endurance riders who are eating on the clock. It is not fully waterproof—if you drop your bike in a river, water will get under the flap—but for 90% of rain showers, the overlapping design sheds water perfectly.
-
Customer Feedback: Riders consistently praise the effortless access but occasionally note that heavily overstuffing the bag can prevent the magnet from engaging securely.
-
Pros:
-
✅ One-handed, zipperless access
-
✅ Zero zipper-failure risk in muddy conditions
-
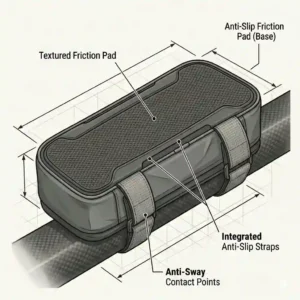
✅ Excellent stability with grippy base material
-
-
Cons:
-
❌ Not submersible/100% waterproof
-
❌ Flap can pop open if severely overpacked
-
-
Verdict: Falling in the mid $50s to $60s range, the Mag-Tank offers unparalleled on-the-fly access that makes it worth every penny for serious riders.
2. Apidura Expedition Top Tube Pack: The Weatherproof Fortress
When absolute protection from the elements is non-negotiable, the Apidura Expedition Top Tube Pack is the industry standard.
Built from a proprietary three-layer laminate fabric with high-frequency welded seams, this bag boasts an IP64 waterproof rating. To translate that spec: you can ride through a torrential, 8-hour Scottish downpour, and the spare battery pack inside will remain bone dry. The bag features a fully waterproof YKK Aquaguard zipper and a covered cable port. What surprised me most during use was how rigid the sidewalls remained; even when completely empty, the bag holds its aerodynamic shape, preventing the dreaded “knee rub” when you stand up to pedal.
This is my go-to recommendation for multi-day bikepackers and winter commuters. If you are carrying sensitive electronics, the welded construction provides unparalleled peace of mind.
-
Customer Feedback: Users rave about the bulletproof waterproofing, though a few mention the waterproof zipper can be stiff to operate with one hand during the first few weeks of use.
-
Pros:
-
✅ 100% waterproof with welded seams
-
✅ Retains shape even when empty
-
✅ Integrated, weather-protected cable port
-
-
Cons:
-
❌ Zipper requires a break-in period
-
❌ Premium price point
-
-
Verdict: Sitting in the high $70s to $80s range, this is an investment piece for the dedicated foul-weather rider or long-distance tourer.
3. Topeak Fuel Tank: The Commuter’s Organizer
The Topeak Fuel Tank has been a staple in the cycling world for years, and its 2026 iteration continues to dominate the commuter and road-touring segment.
Featuring a 420-denier nylon and PVC sponge construction, it comes in medium (0.5L) and large (0.75L) sizes. The standout feature here is the internal padded main compartment with an adjustable mesh divider. What this means for the everyday rider is that your house keys won’t scratch your smartphone screen, and your multi-tool won’t rattle loudly against your CO2 cartridge over rough pavement. The padding also provides structure and a degree of insulation—great for keeping a snack from melting in direct summer sunlight.
I recommend the Topeak for the organized roadie or the daily commuter. It’s bulkier than the sleek Apidura, and the nylon construction means it’s only water-resistant (you’ll want to use the included rain cover in a downpour), but the interior organization is unmatched in this category.
-
Customer Feedback: Buyers love the padded protection for electronics, but some complain that the velcro straps are overly long and require trimming for thinner steel frames.
-
Pros:
-
✅ Padded interior protects sensitive items
-
✅ Internal dividers keep gear organized
-
✅ Very durable outer nylon shell
-
-
Cons:
-
❌ Requires a rain cover for heavy showers
-
❌ Slightly wider profile than competitors
-
-
Verdict: Priced reasonably in the mid $40s to $50s range, it’s a high-value, highly organized option for road and city riders.
4. Restrap Top Tube Bag: The Handcrafted Aesthete
Handmade in Yorkshire, the Restrap Top Tube Bag proves that rugged bikepacking gear can still look incredibly refined.
This 0.8L bag utilizes 100% waterproof textured nylon and features a robust YKK zipper, but the true innovation lies in its strap system. Restrap uses a unique, rubberized paracord and cam-lock mechanism for the steerer tube attachment rather than a standard velcro strap. In practice, this means zero abrasion on your carbon fiber fork or headtube paint, and a much tighter, slip-free grip that eliminates horizontal swaying.
In my experience, this is the perfect match for the modern gravel cyclist who cares as much about their bike’s aesthetic as they do about performance. The 0.8L size is the “Goldilocks” volume—big enough for a day’s ride essentials, but sleek enough to not interfere with your pedal stroke.
-
Customer Feedback: Reviewers frequently highlight the beautiful craftsmanship and paint-friendly straps, though some wish it came in a larger capacity option.
-
Pros:
-
✅ Rubberized straps protect frame paint
-
✅ Excellent build quality and aesthetic
-
✅ Very stable, anti-sway design
-
-
Cons:
-
❌ Only available in one (smaller) size
-
❌ Zipper pull is slightly small for winter gloves
-
-
Verdict: Ranging from the mid $60s to $70s, it’s a premium, stylish, and highly functional piece of kit for the discerning gravel rider.
5. RockBros Bike Bag: The Budget Champion
The RockBros Bike Bag proves that you don’t need to spend half a week’s groceries to get functional cockpit storage.
This bag features a carbon-fiber textured PU shell, a sealed waterproof zipper, and a generous 1.0L capacity. The semi-rigid EVA 3D shell is what makes this bag interesting. This rigid structure means the bag physically cannot collapse or bulge outward, ensuring it won’t interfere with your knees regardless of how poorly you pack it. For beginners, this takes the guesswork out of bag packing.
However, as an expert, I have to point out the trade-offs. The velcro straps are basic and lack the grippy silicone backing found on premium models, meaning it will shift slightly on rough singletrack. Furthermore, while the shell is waterproof, the zipper will eventually leak in sustained rain. This bag is perfect for the fair-weather weekend warrior, the casual commuter, or someone who wants to try a top tube bag before committing to a premium model.
-
Customer Feedback: Customers love the hard-shell look and value, but frequently note the bag can slide side-to-side on narrower steel frames.
-
Pros:
-
✅ Unbeatable price point
-
✅ Rigid shell prevents knee-rub
-
✅ Sleek, aerodynamic appearance
-
-
Cons:
-
❌ Basic straps prone to slipping
-
❌ Zippers degrade faster than premium YKK
-
-
Verdict: Easily found in the low $10s to $20s range, it’s an incredible entry-level option that provides 80% of the performance for 20% of the price.
✨ Don’t Miss These Exclusive Deals!
🔍 Take your cycling setup to the next level with these carefully selected products. Click on any highlighted item to check current pricing and availability. These tools will help you create authentic ride experiences you will love!
🛠️ Practical Usage Guide: Packing & Securing Your Bag
Most riders buy a bag, slap it on their bike, and hit the trail—only to be frustrated when it flops sideways or dumps their gear. Here is my practical roadmap for optimizing your setup.
Step 1: Frame Protection is Mandatory
Even the softest velcro will act like sandpaper once trail dust gets trapped underneath it. Before mounting your bag, apply clear helicopter tape (3M polyurethane) to your top tube and steerer tube. This $5 investment preserves your bike’s resale value and prevents permanent clear-coat damage.
Step 2: The Art of Packing (Center of Gravity)
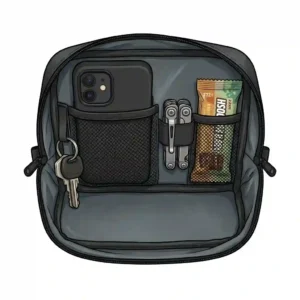
Top tube bags sit high on the bike, which can affect handling if loaded poorly. The rule is: heavy items low and back, light items high and forward. Place your heavy multi-tool and CO2 cartridges at the bottom rear of the bag. Stack lighter items like gels, wrappers, and your smartphone on top. This prevents the bag from acting like a pendulum when you throw the bike side-to-side on a climb.
Step 3: Cable Management
If you are running a dynamo hub or a power bank in your bag to charge your GPS (a common ultra-racing tactic), route the cable through the dedicated port underneath your GPS mount. Leave a small drip-loop in the cable so water runs down the wire and drips onto the ground, rather than funneling directly into the bag’s cable port.
👥 Real-World Case Studies: Matching the Bag to the Rider
Finding the perfect setup isn’t about buying the most expensive option; it’s about matching the engineering to your specific lifestyle. Let’s look at three common profiles:
The 15-Mile Daily Commuter
-
Profile: Rides 5 days a week, mixed weather, needs to carry keys, work badge, phone, and flat kit. Often parks in a public rack.
-
The Perfect Match: Topeak Fuel Tank. The commuter needs internal organization so their keys don’t scratch their phone. Because they park in public, they need a bag they can easily strip off the bike, making a strap-on model preferable to a bolt-on.
The Gravel Ultra-Racer
-
Profile: Competes in events like Unbound Gravel. Spends 12-20 hours in the saddle. Eats constantly while pedaling. Needs to minimize time off the bike.
-
The Perfect Match: Revelate Designs Mag-Tank. When you are 14 hours into a race and your hands are numb from vibration, operating a tight waterproof zipper is maddening. The magnetic one-handed flap of the Mag-Tank allows for effortless fueling, which is the primary use-case for this rider.
The Multi-Day Bikepacker
-
Profile: Riding the Great Divide or touring internationally. Encounters unpredictable, severe weather. Carries sensitive electronics (power banks, mirrorless camera batteries).
-
The Perfect Match: Apidura Expedition. When you are three days away from civilization, absolute waterproofing is a safety requirement, not a luxury. The welded seams ensure that critical electronics survive river crossings and torrential downpours.
🔧 Problem → Solution: Knee Rub, Swaying, and Zippers
In my years of field testing, I’ve seen the same three complaints pop up endlessly. Here is how to solve the most common cockpit bag problems.
Problem 1: The Dreaded “Knee Rub”
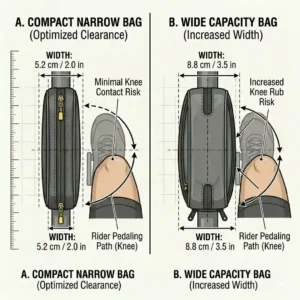
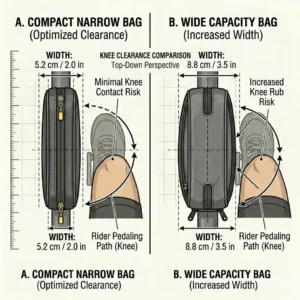
You stand up to pedal, and your inner thighs brush against the bag. Over 50 miles, this becomes agonizing chafing.
-
The Solution: This happens because the bag is either too wide (over 5cm) or you have overstuffed a soft-sided bag, causing it to bulge. Opt for a bag with rigid sidewalls (like the Apidura or RockBros) or plastic inserts. Never pack soft items like windbreakers in this bag, as they expand the sides.
Problem 2: The Sideways Sway
Every time you turn the bars, the bag flops to the left or right, resting crooked on the frame.
-
The Solution: This is an attachment issue. If you have a strap-on bag, replace the standard velcro with double-sided, rubberized Voile straps. Better yet, if your bike frame has top tube bosses (threaded holes), switch to a bolt-on bag. A bolt-on bag physically cannot sway.
Problem 3: Zipper Blowouts
Your bag is only three months old, but the zipper separates in the middle or refuses to close due to mud.
-
The Solution: Zippers die from grit, not force. You must maintain your zippers. Once a month, take an old toothbrush and scrub the zipper teeth with warm soapy water. Once dry, apply a specialized zipper lubricant (or a plain beeswax lip balm) to the teeth. If you ride exclusively in mud, abandon zippers entirely and buy a magnetic flap bag.
🧠 How to Choose the best top tube bag
When evaluating a new cockpit bag, the spec sheet can be overwhelming. I recommend a priority checklist to cut through the marketing hype.
-
Assess Your Frame Mounts: Look at your bicycle’s top tube. Are there two small bolts near the headset? If yes, you should absolutely prioritize a bolt-on bag. It offers a much cleaner aesthetic, eliminates paint wear from straps, and is infinitely more secure.
-
Evaluate Your Weather Exposure: Are you a fair-weather rider, or do you commute year-round? If you ride in the rain, you must check if the bag is “sewn” or “welded.” Sewn bags (even with waterproof fabrics) will eventually leak through the needle holes unless they are seam-taped. Welded bags are completely impervious to water.
-
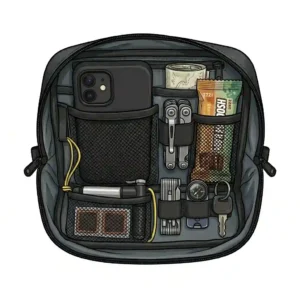
Determine Your Volume Needs: Bigger is not always better. A 1.5L bag holds a lot, but it takes up significant real estate and risks knee-rub. A 0.8L bag is usually the sweet spot for a modern smartphone, a multi-tool, and 3-4 energy gels.
-
Analyze the Opening Mechanism: Zippers offer security; magnetic flaps offer speed. Choose based on your priority. If you go with zippers, look specifically for YKK Aquaguard or similar branded, sealed zippers. Unbranded zippers fail rapidly under tension.
❌ Common Mistakes When Buying Cockpit Bags
What most buyers overlook is the compatibility between the bag and the rest of their bicycle’s geometry. Here are the pitfalls I see constantly in the shop.
Ignoring Stem Clearance (The Slammed Stem Problem)
If you are an aggressive road rider with a “slammed” stem (no spacers between your frame and the stem), many strap-on bags simply won’t fit. They require at least 3-4cm of exposed steerer tube to wrap the front stabilization strap around. If you lack this clearance, you must look for bags designed specifically for slammed stems, which use a rigid bottom bracket or a specialized bolt-on interface that doesn’t require a front strap.
The “Smartphone Size” Trap
Riders often buy a bag based on volume specs, assuming their giant iPhone Pro Max will fit. However, a bag with a tapered, aerodynamic design might have 1.0L of volume but be too narrow at the rear to allow a 6.7-inch phone to lie flat. Always check the internal dimensional length, not just the volume, if phone storage is your primary goal.
Neglecting Standover Height
If you ride a mountain bike or a gravel bike with a high top tube, adding a 4-inch tall bag right in front of the saddle can severely compromise your standover clearance. When you hop off the saddle unexpectedly on a technical trail, that bag can cause painful contact.
🔩 Bolt-On vs. Strap-On: Which Mount is Superior?
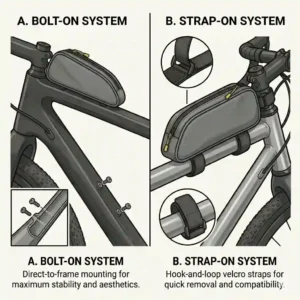
This is the most hotly debated topic in modern bikepacking. As frame manufacturers increasingly add top-tube bosses (threaded inserts) to their bikes, the bolt-on bag has surged in popularity. But is it always better?
The Case for Bolt-On:
In my testing, a bolt-on mount is mechanically superior. Because it hard-mounts directly to the frame via M5 bolts, it eliminates the need for a front steerer tube strap. This provides an incredibly clean look, eliminates the micro-abrasions that velcro causes on paint, and guarantees the bag will never sway sideways.
The Case for Strap-On:
However, strap-on bags still hold a massive market share for a reason. First, many older or road-focused frames simply don’t have top tube bosses. Second, strap-on bags are vastly more portable. If you commute and need to take your bag into the office to prevent theft, ripping a velcro strap takes two seconds; unscrewing two M5 bolts with an Allen key takes two minutes.
Expert Verdict: If your frame has the bolts, and you plan to leave the bag on the bike semi-permanently, buy a bolt-on bag. The stability upgrade is immense. For commuters and vintage frame owners, modern silicone-backed straps are more than adequate.
🌧️ Waterproofing: Features That Actually Matter
Marketing departments love throwing around terms like “waterproof,” “water-resistant,” and “weatherproof.” Let’s demystify what these actually mean for your gear.
When a listing says “Water-Resistant,” it usually means the fabric has a DWR (Durable Water Repellent) coating, but the seams are sewn with a standard needle and thread. In a light drizzle, water beads up and rolls off. In a 30-minute downpour, water seeps through the tiny needle holes and the zipper teeth, soaking your gear.
When a listing says “100% Waterproof” (IP64 or IPX7), it means the bag uses High-Frequency (RF) Welding. Instead of sewing panels together, they use radio waves to melt the TPU/Hypalon panels into a single, seamless piece of material. Combined with a waterproof zipper or roll-top, this bag is a fortress.
If you store a $1,000 smartphone or a vital GPS power bank in your bag, do not settle for water-resistant. The extra $30 for a welded bag like the Apidura is the cheapest insurance policy you can buy for your electronics. You can read more about the physics of waterproof textiles on authoritative sites like Wikipedia’s textile guide or gear deep-dives on Bikepacking.com.
⏳ Long-Term Cost & Maintenance Roadmaps
A top tube bag isn’t a “buy it and forget it” piece of equipment. Understanding the total cost of ownership and the maintenance cycle will save you money in the long run.
The Year One Roadmap:
-
Months 1-3: The zipper will be stiff. Use it frequently to break it in. Check the frame tape underneath the bag after muddy rides to ensure grit hasn’t worked its way under the straps.
-
Months 6-9: UV exposure will begin to degrade the DWR coating on non-welded bags. You will notice water stops beading on the fabric. You should re-treat the bag with a fabric waterproofer like Nikwax.
-
Month 12: Velcro loses its “bite.” If you take your bag on and off daily, the hooks and loops will fray. High-end bags allow you to replace the straps; budget bags (where the strap is sewn directly into the seam) will need to be entirely replaced or duct-taped.
Hidden Cost Analysis: A $20 budget bag with sewn-in velcro and a cheap zipper will likely fail within 12-18 months of hard use. A $70 premium bag with replaceable straps and YKK zippers will easily last 5+ years. From a total cost of ownership perspective, the premium bag is actually cheaper over a 5-year cycle, whilst keeping your gear safer.
✨ Don’t Miss These Exclusive Deals!
🔍 Ready to optimize your cockpit? Click on any of the highlighted products above to check current pricing, explore color options, and read more user reviews to find your perfect match today!
🏁 Conclusion
Choosing the best top tube bag ultimately comes down to understanding your specific riding environment. We’ve moved far beyond the flimsy, swaying pouches of a decade ago. Today, whether you opt for the one-handed speed of the Revelate Mag-Tank, the impenetrable fortress of the Apidura Expedition, or the unbeatable value of the RockBros, there is a highly engineered solution for your cockpit.
Remember, the goal of this piece of gear is seamless integration. It should hold exactly what you need, protect it from the elements you ride in, and sit so stably on your frame that you completely forget it’s there—until you need that critical energy gel at mile 80. By prioritizing features like mounting stability, frame clearance, and realistic waterproofing needs over mere volume, you’ll find the perfect companion for your miles ahead.
❓ FAQs
❓ What size top tube bag is best?
✅ For most riders, 0.8L to 1.0L is the ideal size. It provides enough volume for a modern smartphone, a multi-tool, and ride nutrition without becoming so wide that your knees brush against it when pedaling out of the saddle…
❓ Do top tube bags scratch your bike frame?
✅ Yes, they can. Dirt and grit inevitably get trapped beneath velcro mounting straps, acting like sandpaper against your clear coat. Always apply clear 3M protective frame tape to your top tube before installing a strap-on bag…
❓ Can a top tube bag fit a phone?
✅ Most modern bags over 0.8L can fit a standard smartphone. However, for “Pro Max” or “Ultra” sized phones (over 6.5 inches), check the bag’s internal length specs, as aerodynamic tapers can prevent large phones from laying flat…
❓ What is the difference between bolt on and strap on bags?
✅ Bolt-on bags attach directly to threaded mounts on your frame, offering superior stability and a cleaner look. Strap-on bags use velcro to wrap around the frame, making them universally compatible with any bike but slightly more prone to swaying…
❓ Are magnetic closures better than zippers for bike bags?
✅ Magnetic closures offer superior, one-handed access and cannot fail due to mud or grit, making them ideal for racing. However, they are not completely waterproof. Zippers provide better weather sealing but require two hands and regular cleaning…
📖 Recommended for You
- 2026’s Top 5 Picks: The Ultimate waterproof bicycle bag Guide ⚡
- Top Tube Bike Bag: 7 Best Picks Every Cyclist Needs (2025)
- 7 Best Bicycle Top Tube Bag Picks for 2025: Boost Your Ride!
Disclaimer: This article contains affiliate links. As an Amazon Associate, I earn from qualifying purchases. If you purchase products through these links, we may earn a small commission at no additional cost to you.
✨ Found this helpful? Share it with your friends! 💬🤗
[addtoany]