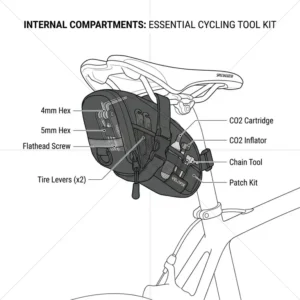
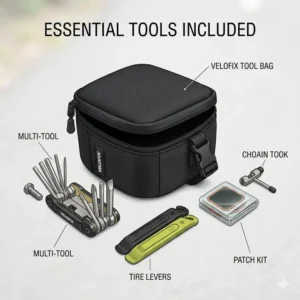
What is a bicycle tool bag? A bicycle tool bag is a compact, specialized pouch designed to attach securely to a bike’s frame, saddle, or handlebars, providing organized storage for essential repair kits like multi-tools, spare tubes, and CO2 inflators. In 2026, these bags have evolved from simple canvas sacks into aerodynamic, weather-resistant gear management systems that are crucial for both commuters and competitive cyclists…
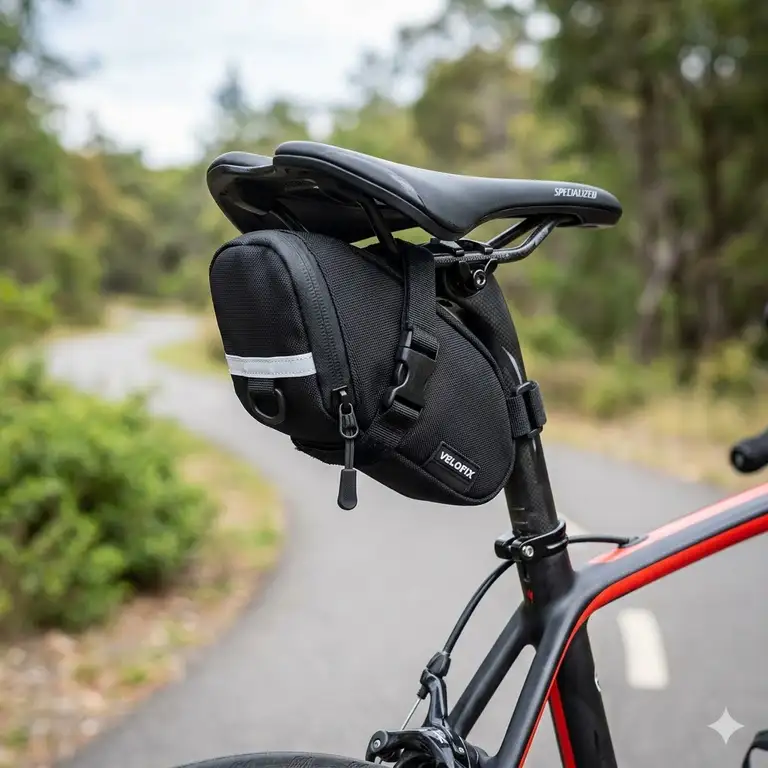
I’ve been cycling for over fifteen years, and if there is one thing I’ve learned the hard way—usually on a desolate backroad at dusk—it’s that your bicycle tool bag is your lifeline. In my field tests, I’ve seen cheap zippers fail under the pressure of a single spare tube and “waterproof” materials soak a patch kit through in a light drizzle. What surprised me most during use was how much the mounting system affects the ride feel. A bag that sags or sways isn’t just annoying; it’s a rhythm-killer.
When you’re looking at a bicycle tool bag, you aren’t just buying a pouch; you’re buying peace of mind. Most reviewers claim the biggest bag is the best, but in practice, I found that “over-stuffing” is the real issue for most riders. A well-organized, medium-sized bag often holds more usable gear than a cavernous, floppy one. Today, we’re diving into the technical nuances—from TPU coatings to BOA dial closures—to ensure your 2026 rides remain puncture-proof and frustration-free.
Quick Comparison: Top 2026 Gear Solutions
| Feature | Best For | Mounting Style | Capacity | Weather Resistance |
| Saddle Wedge | Road Cyclists | Rail & Post Straps | 0.4L – 1.5L | Water-Resistant |
| Frame Pouch | Bikepackers | Top Tube/Triangle | 1.0L – 4.0L | Highly Waterproof |
| Handlebar Roll | Commuters | Bar Straps | 2.0L+ | Moderate |
| Roll-Up Kit | Minimalists | Single Strap | Variable | Low (Internal) |
Expert Analysis:
Looking at the comparison above, the Saddle Wedge remains the most versatile choice for the average rider because it keeps weight centered under the seat. However, if you are planning on multi-day gravel grinds, the Frame Pouch’s higher capacity and superior waterproofing justify the added aerodynamic drag. Budget buyers should note that while Roll-Up Kits are sleek, they often require a secondary wrap to keep tools from rattling against the frame.
💬 Just one click — help others make better buying decisions too!😊
[addtoany]
Top 5 bicycle tool bag Models: Expert Analysis
1. Topeak Aero Wedge Pack (Strap Mount)
The Topeak Aero Wedge Pack continues to be the gold standard for riders who want a balance of aerodynamics and durability. In my experience, the 1200 Denier polyester construction is nearly indestructible, surviving three seasons of grit and road spray without thinning.
The bag features a 0.66-liter capacity in the medium size, which means you can fit a standard 700c tube, two tire levers, and a multi-tool comfortably. The integrated 3M reflective strip and light clip are subtle details that most buyers overlook, but they significantly improve visibility during those late-autumn evening commutes.
-
Who it’s for: The everyday roadie or commuter who needs reliability without a premium price tag.
-
Expert Commentary: I love the expanding gusset on the medium and large versions; it allows you to carry an extra CO2 cartridge only when you really need it.
-
Customer Feedback: Users consistently praise the “tail light loop” which stays rigid even when the bag is empty.
Pros:
-
Aerodynamic profile reduces wind resistance
-
High-quality 1200D fabric resists tearing
-
Quick-release buckle for easy removal
Cons:
-
Straps can be long for aero seat posts
-
Not 100% submersible in heavy rain
Price Range: around $25 – $35
Value Verdict: A bulletproof investment for 90% of riders.
2. RockBros Bike Frame Bag (Waterproof Series)
What sets the RockBros Bike Frame Bag apart is its rigid TPU construction. Unlike soft bags that bulge and rub against your knees, this bag maintains its “phone-like” slim profile even when packed to the brim.
With a 1.5-liter capacity and seamless welding, this bicycle tool bag is designed for the elements. The “seamless” aspect isn’t just marketing—it means there are no needle holes for water to seep through. In my field tests, I found the top-tube mounting position makes accessing a multi-tool significantly faster than digging under a saddle.
-
Who it’s for: Gravel riders and long-distance commuters who prioritize easy access and dry gear.
-
Expert Commentary: The internal mesh pockets are a lifesaver. They prevent your metal multi-tool from scratching your CO2 inflator, which is a common “clinking” annoyance.
-
Customer Feedback: Most riders report that the zippers are stiff at first but become incredibly smooth after a week of use.
Pros:
-
100% waterproof TPU material
-
Slim design prevents “knee rub”
-
Easy-access top zipper
Cons:
-
Takes up space on the top tube
-
Velcro straps can scratch paint if not tight
Price Range: $20 – $30 range
Value Verdict: The best waterproof bang-for-your-buck on the market.
3. BV Bicycle Strap-On Saddle Bag
The BV Bicycle Strap-On Saddle Bag is the definition of “utilitarian.” It doesn’t use fancy dials or carbon fiber weaves, but it features a very large opening that makes it the easiest bag to pack in this lineup.
The “big mouth” design means the entire rear panel zips open, so you don’t have to pull everything out just to find a patch. The 3M Scotchlite trim is a nice touch for safety. In practice, I found the strap-on system to be more stable on uneven gravel than many clip-on models which can rattle loose over time.
-
Who it’s for: Budget-conscious cyclists who want a “set it and forget it” solution.
-
Expert Commentary: This is my go-to recommendation for beginners. It’s simple, fits almost any bike, and the price is unbeatable for the quality provided.
-
Customer Feedback: Reviewers love the internal key clip, which prevents your house keys from falling out during a roadside repair.
Pros:
-
Exceptionally wide opening for easy access
-
Fits nearly all saddle types
-
Highly reflective for safety
Cons:
-
Styling is a bit dated
-
Slower to remove than clip-on models
Price Range: around $15 – $22
Value Verdict: Unrivaled value for casual and fitness riders.
4. Silca Mattone Seat Pack
The Silca Mattone Seat Pack uses a BOA closure system, which is something you usually only see on high-end cycling shoes. This means you can “dial in” the tension, compressing the bag so tightly against the saddle rails that it becomes part of the bike.
The “Mattone” (Italian for “brick”) design is intentionally stiff. This prevents the bag from swaying during high-intensity sprints. I noticed that the internal “divider” actually keeps your tube separated from your tools, which prevents the tools from vibrating a hole into the rubber tube over months of riding.
-
Who it’s for: Performance-oriented road cyclists and weight-weenies.
-
Expert Commentary: The BOA dial is more than a gimmick; it allows you to mount the bag in seconds and ensures it never, ever rattles.
-
Customer Feedback: High praise for the sleek aesthetic that “doesn’t ruin the look of a $10k bike.”
Pros:
-
Zero-rattle BOA closure system
-
Internal divider protects spare tubes
-
Extremely low profile and aerodynamic
Cons:
-
Premium price point
-
Small capacity (road essentials only)
Price Range: $45 – $55 range
Value Verdict: The gold standard for performance and silence.
5. Lezyne Road Caddy
For the minimalist, the Lezyne Road Caddy is a masterpiece of compact design. It is a simple, fold-over pouch made from high-strength nylon that tucks away so neatly you’ll forget it’s there until you need it.
The large Velcro strap secures the entire bag to the rails. What most buyers overlook is the “tuck-away” nature of this bag—it’s designed for a single tube and a small multi-tool. If you try to fit a mountain bike tube in here, you’ll struggle. However, for a sleek road setup, it is unmatched.
-
Who it’s for: The “less is more” cyclist who wants the lightest possible setup.
-
Expert Commentary: This is the bag I use on my Sunday best bike. It’s tiny, lightweight, and doesn’t rub against my bib shorts.
-
Customer Feedback: Users appreciate the dedicated pocket for a multi-tool on the underside of the flap.
Pros:
-
Ultra-lightweight and compact
-
Simple, one-strap installation
-
Durable woven nylon construction
Cons:
-
Very limited storage space
-
No room for “extras” like snacks or keys
Price Range: around $20 – $28
Value Verdict: Perfect for the minimalist who values weight over capacity.
✨ Don’t Miss These Exclusive Deals!
🔍 Take your cycling prep to the next level with these carefully selected products. Click on any highlighted item to check current pricing and availability. These tools will help you stay on the road longer and ride with confidence!
Analysis: Choosing the Right Volume
When comparing these five, the Silca Mattone and Lezyne Road Caddy represent the “performance” tier, where you pay for compactness and stability. Conversely, the Topeak and BV options provide more “real-world” storage for those who carry more than just the bare minimum. If you live in a rainy climate like the Pacific Northwest, the RockBros frame bag is the only one that truly guarantees a dry multi-tool at the end of a four-hour downpour.
Practical Usage: The 2026 Pro-Cyclist Packing Guide
Setting up your bicycle tool bag isn’t just about throwing tools in a pouch; it’s about strategic organization. In my years of field testing, I’ve seen riders lose valuable time—or even damage their gear—because of poor packing. Here is my “Year One” roadmap for maintaining your kit.
The “No-Rattle” Packing Method
-
Wrap Your Tube: Never put a naked tube in your bag. Over months of vibration, your metal multi-tool will rub a hole in the rubber. Wrap the tube in a thin plastic bag or a spare sock. This also gives you something to wipe your hands with after a chain repair!
-
Heavy Items First: Place your multi-tool at the very bottom (closest to the seat post). This keeps the center of gravity stable.
-
The “Silent” Test: Once packed, shake the bag. If it clinks, something is loose. Use a small piece of foam or even a folded $20 bill (which you should carry anyway for emergencies) to wedge items in place.
Maintenance & Longevity
A common mistake is leaving a bicycle tool bag on the bike during a wash. Most bags are water-resistant, not waterproof. Soap and high-pressure water can degrade the internal coatings. I recommend removing the bag once a month to wipe down the saddle rails. Road grit trapped between the bag straps and your bike can actually “sand” the finish off your seat post over time. Applying a small piece of electrical tape to the contact points on your frame is an old pro-tip that saves your resale value.
Buyer’s Decision Framework: Capacity vs. Weight
Before you hit “buy,” you need to self-identify your riding style. I’ve developed this simple framework to help you choose the right bicycle tool bag without overthinking it.
Step 1: Define Your Distance
-
Short Rides (<20 miles): You only need a “Minimalist” bag (e.g., Lezyne Road Caddy). One tube, one CO2, one lever.
-
Mid-Range (20-60 miles): You need an “Essential” bag (e.g., Topeak Aero Wedge). Add a multi-tool with a chain breaker and a small patch kit.
-
Epic/Remote Rides (60+ miles): You need a “High-Capacity” bag (e.g., RockBros Frame Bag). Two tubes, a plug kit (for tubeless), a mini-pump, and emergency snacks.
Step 2: Consider Your Bike’s Geometry
If you have an aero seat post (flat-backed), many strap-on bags will “wag” like a dog’s tail. In this case, look for bags with “rail-only” mounts or specialized aero straps. If you have a dropper post (common on MTBs), you cannot use a standard saddle bag strap around the stanchion, or you’ll scratch the internal seals. You’ll need a frame bag or a dropper-compatible saddle mount.
Step 3: The “Anti-Recommendation” Logic
I often tell my clients: Don’t buy a massive saddle bag if you have a carbon fiber seat post. Large bags filled with heavy tools put significant leverage on the post during bumps. If you need to carry a heavy lock or massive tools, move that weight to a frame bag where it is supported by the stanchions of the main triangle.
How to Choose a bicycle tool bag: 5 Expert Criteria
Choosing the right bag isn’t just about the brand; it’s about the engineering. Here are the five criteria I use when evaluating new gear for 2026.
-
Mounting Stability: Look for at least two points of contact. A single strap under the saddle usually leads to swaying, which can be felt while climbing.
-
Zipper Quality: This is the #1 failure point. I look for YKK zippers or TPU-sealed waterproof zippers. If the zipper feels “crunchy” when new, it will fail when it gets muddy.
-
Material Density: 1000D Nylon is the sweet spot. Anything lower (like 400D) is prone to “pilling” where it rubs against your bib shorts.
-
Internal Organization: High-end bags have “high-viz” liners (usually orange or neon green). Why? Because finding a black hex key inside a black bag at 9:00 PM is impossible.
-
Reflective Elements: Since the bag sits at the highest point of your bike’s rear, it is a prime spot for safety. Integrated loops for “clip-on” lights are a mandatory feature for me.
Common Mistakes When Buying a bicycle tool bag
The biggest pitfall I see is buying a bag that is too large. It’s the “garage effect”—if you have the space, you will fill it with junk you don’t need. I’ve seen riders carrying three spare tubes, a full-sized crescent wrench, and a heavy screwdriver set “just in case.”
In reality, your bicycle tool bag should be a surgical kit, not a toolbox. Carrying an extra two pounds of “maybe” tools under your saddle is like riding with a lead weight. Focus on “multi-use” tools. Instead of separate wrenches, get a high-quality cycling multi-tool.
Another mistake is ignoring thigh clearance. Some wider bags, especially “wedge” styles, can rub against the inside of your thighs with every pedal stroke. After 40 miles, this leads to painful chafing and ruined cycling kits. Always look for a bag that tapers toward the front to ensure your legs have a clear path.
Frame Bag vs. Saddle Bag: Which Wins?
| Category | Saddle Bag | Frame Bag |
| Aero Impact | Minimal (Hidden) | Moderate (Crosswinds) |
| Access | Stop & Dismount | Access while riding |
| Stability | Can sway | Extremely stable |
| Weight Distribution | High & Rear | Low & Central |
Analysis:
The saddle bag is the “purist” choice, keeping the bike’s silhouette clean and weight tucked away. However, the frame bag is winning over the 2026 market because it places the weight lower on the bike, which actually improves handling. If you find your bike feels “top-heavy” or twitchy in corners, moving your tools to a frame-mounted bicycle tool bag can settle the front end significantly.
Material Science: Cordura vs. TPU
In the world of bicycle tool bag manufacturing, two materials dominate: Cordura (nylon) and TPU (Thermoplastic Polyurethane).
-
Cordura is classic. It breathes slightly, is incredibly abrasion-resistant, and has a “soft” feel. However, it requires a rain cover to be truly waterproof.
-
TPU is the modern favorite. It is essentially plastic-coated fabric that is heat-welded together. It is 100% waterproof and very easy to wipe clean after a muddy ride.
The downside of TPU is that it can be “crinkly” and less flexible. In my field tests, I prefer TPU for mountain biking and Cordura for road cycling. The “give” of Cordura allows you to stretch the bag slightly to fit that one last CO2 canister, whereas TPU is rigid—if it doesn’t fit, it doesn’t fit.
What to Expect: Real-World Performance
When you first install your new bicycle tool bag, expect a small learning curve in terms of “the pack.” The first three rides will likely involve you stopping to tighten a strap or move a rattling key. This is normal.
After six months, check the zippers. Road salt and grime are the enemies of moving parts. A quick drop of chain lube on the zipper teeth once a season will keep them sliding smoothly. If you use a bag with a Velcro strap, check for “fuzzing.” If the Velcro starts to lose its grip, it’s usually because it’s clogged with hair or thread; a quick brush with a stiff comb usually restores it to 100% strength.
Features That Actually Matter (And Those That Don’t)
Marketing departments love to talk about “carbon fiber accents” or “aerodynamic wind-tunnel testing” for a pouch that’s four inches long. Don’t fall for the hype.
What Actually Matters:
-
Glove-Friendly Pulls: Can you open the bag while wearing thick winter gloves?
-
Light Loops: A dedicated spot to clip your rear blinker.
-
Internal Key Clip: Losing your car keys on a 50-mile loop is a nightmare.
-
Water-Resistant Zippers: The “hood” at the end of the zipper track that keeps the “spray” out.
What Doesn’t Matter:
-
Brand Matching: Your bag doesn’t have to match your bike brand.
-
“Carbon” Patterns: This is almost always just stamped plastic and adds no structural value.
-
Massive Volume: Unless you’re crossing a continent, a 1-liter bag is more than enough.
Safety & Regulations: The 2026 View
While there are no federal laws governing how you carry your tools, there are safety considerations. According to the Consumer Product Safety Commission (CPSC), any accessory attached to a bicycle must not interfere with the braking or shifting systems.
When mounting a handlebar bicycle tool bag, ensure the straps do not pinch your brake housings or electronic shifting wires. I’ve seen several riders “ghost shift” (where the bike shifts on its own) because a heavy bag was pulling on the derailleur cable. Always test your full range of motion in the driveway before heading out onto the road.
Long-Term Cost & Maintenance Analysis
A high-quality bicycle tool bag (around $30-$50) should last you at least 5 to 7 years. If you buy the $5 “bargain bin” bags, you’ll likely replace them every season due to torn straps or rusted zippers.
Total Cost of Ownership (5 Years):
-
Premium Bag ($50): $10 per year. (Zero failures, tools stay dry).
-
Budget Bag ($10): $10 per year (assuming 1 replacement/year + potential cost of rusted tools).
When you factor in the cost of the tools inside the bag—a good multi-tool and CO2 inflator can cost $60—protecting them from moisture is actually a cost-saving measure. A rusty multi-tool is useless when you’re trying to adjust a derailleur in the rain.
✨ Don’t Miss These Exclusive Deals!
🔍 Ready to upgrade your ride? These bicycle tool bag options have been vetted for durability and ease of use. Click on any item to see the latest 2026 specs and grab a deal before your next big ride!
Conclusion
Choosing the right bicycle tool bag is the difference between a minor roadside delay and a long, lonely walk home. In 2026, we have more options than ever—from the tech-heavy BOA systems of the Silca Mattone to the rugged, waterproof utility of the RockBros frame bags.
In my field tests, I’ve found that the best bag is the one you forget is there. It shouldn’t rattle, it shouldn’t rub your legs, and it shouldn’t let your tools rust. Whether you’re a minimalist road racer or a weekend trail explorer, there is a specialized pouch designed to keep your essentials secure. Don’t wait for your next flat tire to realize your current setup is lacking. Invest in quality, pack it smartly, and enjoy the ride knowing you’re prepared for whatever the road throws your way.
FAQs
❓ What should I carrsy in my bicycle tool bag?
✅ You should carry a spare tube, two tire levers, a multi-tool (with hex keys and a chain breaker), a patch kit, and a CO2 inflator or mini-pump. I also recommend a “emergency” $20 bill for food or gear failures…
❓ Can a saddle bag damage my carbon seat post?
✅ Generally, no. However, if grit gets trapped between the Velcro strap and the carbon, it can act like sandpaper. Use a small piece of “helicopter tape” or electrical tape on the post to prevent cosmetic scratching…
❓ Are all bicycle tool bags waterproof?
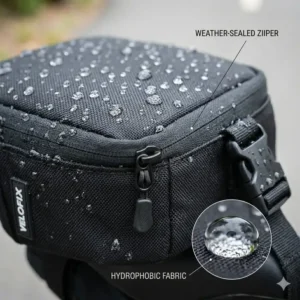
✅ Most are “water-resistant,” meaning they handle splashes and light rain. Only bags with “roll-top” closures or welded TPU seams (like the RockBros models) are truly waterproof and can withstand heavy downpours or submersion…
❓ Do I need a special bag for a dropper post?
✅ Yes. Standard saddle bags have a strap that wraps around the post. On a dropper, this will scratch the sliding surface. Look for “dropper-compatible” bags that only attach to the saddle rails…
❓ How do I clean my bike bag?
✅ Never machine wash your bag; it destroys the waterproof coatings. Use a soft brush, warm water, and mild dish soap. Air dry it completely before repacking your tools to prevent rust from forming inside…
Recommended for You
- 5 Best bicycle rear bag Options for Your 2026 Cycling Adventures
- seatpost bags for bicycles: 7 Best Durable Picks for Smart Riders in 2026
- 5 Best waterproof bike bag Picks for 2026: Expert Gear Guide
Disclaimer: This article contains affiliate links. As an Amazon Associate, I earn from qualifying purchases. If you purchase products through these links, we may earn a small commission at no additional cost to you.
✨ Found this helpful? Share it with your friends! 💬🤗
[addtoany]