In the world of cycling, rear fenders are much more than just curved pieces of plastic or metal hovering over your back tire. By definition, a rear fender is a vehicle component that frames the wheel well, specifically designed to prevent sand, mud, rocks, liquids, and other road spray from being thrown into the air by the rotating tire. For cyclists, they are the primary defense against the dreaded “skunk stripe”—that vertical line of muddy water that paints your back and seat the moment the pavement gets damp.
As we move through 2026, the technology behind these guards has evolved. We aren’t just looking at heavy, rattling metal stays anymore. Modern designs utilize high-impact polycarbonates and clever quick-release mounts that cater to everything from sleek carbon road bikes to beefy electric cargo bikes. Whether you are a dedicated commuter or a weekend trail rider, understanding the geometry of spray patterns is essential. Without a properly fitted guard, your rear tire acts as a centrifugal pump, depositing road grime directly onto your drivetrain and your person.
Choosing the right protection involves balancing weight, coverage, and mounting compatibility. According to Wikipedia’s entry on mudguards, the effectiveness of a fender is largely determined by its length and how close it sits to the tire surface. In this guide, I’ll break down the technical nuances that the marketing brochures skip, helping you find a solution that keeps you dry without ruining your bike’s aesthetic.
Quick Comparison: Top 2026 rear fenders at a Glance
Choosing a fender often feels like a trade-off between “maximum protection” and “ease of removal.” The table below highlights how the leading models for 2026 stack up in terms of coverage and mounting style.
| Product Model | Best Use Case | Material | Mounting Style | Coverage Level |
| SKS Bluemels Style | All-Weather Commuting | Aluminum/PET Sandwich | Bolt-on Stays | Full (High) |
| PDW Origami | Occasional Rain/Road | Recycled Plastic | Strap-on / Clip | Partial (Medium) |
| Planet Bike Cascadia | Heavy Duty Touring | Polycarbonate | Eyelet Mount | Full (High) |
| Ass Savers Fendor Bendor | Minimalist/Racing | Foldable Plastic | Tool-free Wrap | Partial (Low) |
| Zefal No Mud | Mountain/Gravel | Technopolymer | Universal Frame Mount | Mid (Adjustable) |
Expert Analysis: If you are looking for a “set it and forget it” solution for a dedicated commuter bike, the SKS Bluemels Style offers the most stability. However, for those riding high-performance bikes without mounting eyelets, the PDW Origami provides a surprisingly rigid platform that won’t rattle loose on rougher 2026 urban asphalt. Budget-conscious riders should lean toward the Ass Savers for emergency use, but don’t expect it to keep your feet or drivetrain clean.
💬 Just one click — help others make better buying decisions too!😊
[addtoany]
Top 5 rear fenders: Expert Analysis for 2026
When selecting these products, I looked for real-world durability and mounting versatility. In 2026, many bikes have moved away from traditional eyelets, making “universal” fitment more important than ever.
1. SKS Bluemels Style — The Gold Standard for Full Coverage
The SKS Bluemels Style is a refined take on a classic design, featuring a matte finish and extended mud flaps.
-
Key Specs: 700c wheel compatibility with widths up to 65mm; 3mm stainless steel stays for vibration damping.
-
Real-World Meaning: The “sandwich” construction (aluminum strips inside plastic) ensures the fender won’t snap if a stick gets caught, providing much higher safety than pure plastic models.
-
Expert Opinion: This is for the rider who treats their bike like a car replacement. In my experience, the extra-long spoiler at the bottom is the real hero; it prevents water from spraying back onto your bottom bracket, significantly extending the life of your expensive bearings.
-
Customer Feedback: Users frequently praise the silent operation, though some note that initial installation can take 45 minutes of fine-tuning.
-
Pros:
-
Extreme durability due to reinforced core.
-
Flexible mud flap for added spray protection.
-
Highly stable at high speeds.
-
-
Cons:
-
Requires frame eyelets or adapters.
-
Weight is higher than clip-on alternatives.
-
-
Price Range: Around $55-$70.
-
Value Verdict: The best long-term investment for year-round commuters who demand a dry back.
2. Portland Design Works Origami — The Urban Minimalist
The Portland Design Works Origami uses a clever folding design inspired by the Japanese art of paper folding.
-
Key Specs: Constructed from heavy-duty recycled plastic; single-bolt or strap attachment.
-
Real-World Meaning: Because it folds into a rigid 3D shape, it doesn’t flap around like flatter “clip-on” guards, even when hitting potholes at 20 mph.
-
Expert Opinion: I recommend this for the “fair weather” commuter who occasionally gets caught in a 2026 spring shower. It’s lightweight enough that you won’t feel it, but rigid enough to stay centered over the tire.
-
Customer Feedback: Commuters love that it can be removed in seconds when the sun comes out, though some wish it were 2 inches longer for total protection.
-
Pros:
-
Eco-friendly recycled materials.
-
Super fast, tool-free installation.
-
Extremely lightweight.
-
-
Cons:
-
Won’t protect your front derailleur.
-
Slightly prone to being stolen if left on a locked bike.
-
-
Price Range: $20-$30 range.
-
Value Verdict: Perfect for roadies and urbanites who value aesthetics and speed over total coverage.
3. Planet Bike Cascadia ALX — The Touring Workhorse
For those who live in the Pacific Northwest or similar rain-heavy climates, the Planet Bike Cascadia ALX is a legend.
-
Key Specs: All-aluminum construction; includes V-stays for maximum rigidity.
-
Real-World Meaning: Unlike plastic guards that can warp over time in high heat or extreme cold, these aluminum guards stay perfectly true for years of service.
-
Expert Opinion: What most buyers overlook is the release tabs on the stays. If a rock gets jammed between the tire and fender, the stays “pop” out of the bracket rather than locking your wheel and sending you over the bars. That’s a 2026 safety standard every rider should want.
-
Customer Feedback: Long-distance tourers rave about the lack of “fender rub” noise, though they mention the hardware can rust if not rinsed after salty winter rides.
-
Pros:
-
Unmatched structural integrity.
-
Safety release mechanism for the stays.
-
Available in wide sizes for gravel/MTB.
-
-
Cons:
-
Harder to “tweak” into shape than plastic.
-
Silver finish can show scratches over time.
-
-
Price Range: Around $65-$85.
-
Value Verdict: The ultimate choice for bike packers and those who put 5,000+ miles on their bike annually.
4. Ass Savers Fendor Bendor Big — The Emergency Lifesaver
The Ass Savers Fendor Bendor Big is a foldable mudguard that lives in your bag until the clouds break.
-
Key Specs: Tool-free attachment to seat stays or seat tube; compatible with almost any frame.
-
Real-World Meaning: It’s a “floating” fender, meaning it doesn’t need any mounting holes. You simply wrap the Velcro strap, and you have a 50cm shield.
-
Expert Opinion: Don’t be fooled by the simplicity; for a bike with zero clearance (like many 2026 aero road bikes), this is often the only option. It won’t keep your bike clean, but it will keep your chamois dry, which is the difference between a fun ride and a miserable one.
-
Customer Feedback: High marks for portability; however, some users with very thin seat stays find it can rotate if the strap isn’t overtightened.
-
Pros:
-
Fits almost any bike (MTB, Road, Gravel).
-
Folds down to fit in a jersey pocket.
-
Zero weight penalty.
-
-
Cons:
-
Offers no protection for the drivetrain.
-
Can look a bit “DIY” on high-end builds.
-
-
Price Range: $15-$25 range.
-
Value Verdict: An essential “just in case” accessory for every cyclist’s toolkit.
5. Zefal No Mud — The Universal MTB Guard
The Zefal No Mud is unique because it can be used as either a front or a rear fender.
-
Key Specs: Universal mounting system for seat stays or front forks; adjustable angle.
-
Real-World Meaning: Most rear fenders for mountain bikes attach to the seat post, which doesn’t work well with “dropper” posts (the ones that go up and down). The No Mud mounts to the frame itself, leaving your seat post free to move.
-
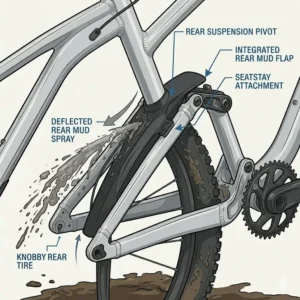
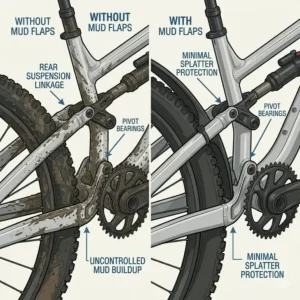
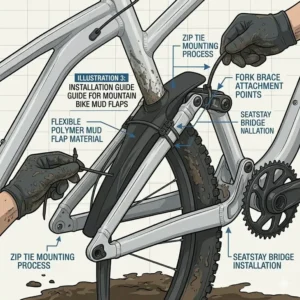
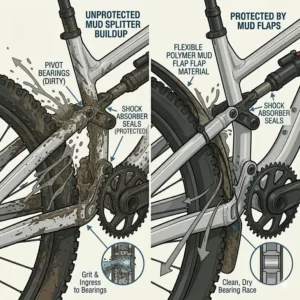
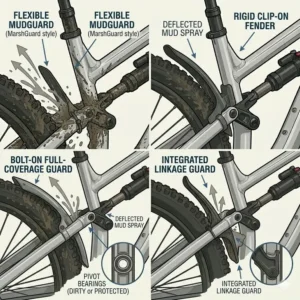
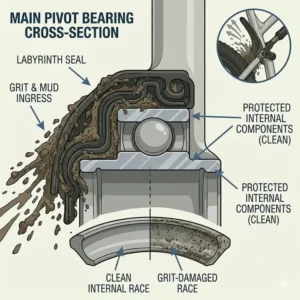
Expert Opinion: If you’re riding a full-suspension mountain bike in 2026, this is your best bet. Because it sits close to the tire, it catches mud before it gets flung into your rear suspension pivots, potentially saving you hundreds in bearing replacements.
-
Customer Feedback: Trail riders appreciate the sturdy build, though some mention it takes a few tries to get the angle exactly right so it doesn’t buzz against the tire.
-
Pros:
-
Works perfectly with dropper seat posts.
-
Heavy-duty protection for suspension components.
-
Versatile front or rear usage.
-
-
Cons:
-
Can be tricky to align on asymmetrical frames.
-
Not as “sleek” as road-specific models.
-
-
Price Range: Under $35.
-
Value Verdict: The smart choice for mountain bikers looking to protect their expensive suspension.
✨ Don’t Miss These Exclusive Deals!
🔍 Take your cycling experience to the next level with these carefully selected rear fenders. Click on any highlighted item to check current pricing and availability. These tools will help you stay dry and keep your bike running smoothly through every season!
Practical Usage Guide: How to Install rear fenders Without the Headache
Installing rear fenders is notoriously one of the most frustrating bike maintenance tasks, but it doesn’t have to be. In 2026, many manufacturers have moved toward “pre-assembled” stays, but the fine-tuning is still up to you.
Step 1: The “Dry Fit”
Before tightening any bolts, hold the fender in place. Check the clearance between the tire and the fender. You want at least 10mm to 15mm of space. In my experience, if you can’t fit your pinky finger between the tire and the guard, you’re going to hear a “scritch-scritch” sound every time you stand up to pedal.
Step 2: Mind the Chainstays
The tightest spot is usually where the fender passes between the chainstays near the bottom bracket. If the fender is too wide, don’t force it. You can gently “dimple” plastic fenders with a heat gun (carefully!) or use a zip-tie to pull the fender closer to the frame bridge.
Step 3: Use Blue Threadlocker
Bicycles vibrate—a lot. Fender bolts are notorious for rattling loose after a few miles. Applying a small drop of medium-strength (blue) threadlocker to your mounting bolts will save you from a “clatter-fest” halfway through your commute. This is a pro tip that can prevent the fender from shifting into your spokes.
Step 4: Leveling the Stays
Once the main body is attached, adjust the metal stays. The goal is a perfect arc that follows the curve of the tire. If the fender looks “wavy,” loosen the stay clamps, adjust the length, and re-tighten. A well-aligned fender is not just about looks; it’s about ensuring road debris has a clear path to exit.
Buyer’s Decision Framework: Which rear fenders Suit You?
If you are staring at the five products above and aren’t sure which way to lean, use this “If/Then” logic to find your match.
-
If you have a dedicated “Commuter” bike with eyelets: Choose the SKS Bluemels Style. The permanent installation pays off in the first week of rain. You won’t have to think about it again for three years.
-
If you ride a high-end Carbon Road bike with no mounts: Go for the PDW Origami or Ass Savers. These won’t scratch your expensive paint and can be removed for your Sunday club ride.
-
If you own a Mountain Bike with a Dropper Post: You must choose a frame-mounted option like the Zefal No Mud. Any fender that clamps to the seat post will either get crushed or prevent your seat from lowering.
-
If you are planning a Cross-Country Tour: The Planet Bike Cascadia ALX is the only one I’d trust for 500+ miles of mixed terrain. The aluminum won’t fatigue and crack under the weight of mud and grit.
Decision Priority Checklist:
Does my frame have eyelets? (Yes = Full Fenders / No = Clip-ons)
How much tire clearance do I have? (Need at least 10mm)
Do I need to remove them frequently? (Clip-ons are better here)
How to Choose rear fenders: The Expert Criteria
When you’re browsing the 2026 market, don’t just look at the price tag. Here are the technical factors that actually determine if a fender will work for you.
1. Tire Width Compatibility
This is where most beginners fail. A fender must be at least 8mm to 10mm wider than your tire. If you are running 35mm gravel tires, you need a 45mm fender. If the fender is the same width as the tire, water will simply wrap around the edges and spray your legs anyway.
2. Coverage Length
Check where the rear fender ends. For maximum protection, it should extend past the 12 o’clock position and reach down toward the 9 o’clock position (level with the axle). If the fender is too short, the spray will still hit the rider behind you, which is a big “no-no” in group riding etiquette.
3. Material Science
-
Polycarbonate: Great for impact resistance; won’t dent.
-
Aluminum: Superior rigidity; looks premium; can be noisy if hit by stones.
-
Sandwich (AL/Plastic): The best of both worlds—quiet like plastic but stiff like metal.
Common Mistakes When Buying rear fenders
Even seasoned riders make these blunders. Avoid them to save time and money.
Ignoring “Toe Overlap”
On smaller bike frames, adding a front fender (often sold with the rear) can lead to your shoe hitting the fender when you turn. While this guide focuses on rear fenders, always check if your rear setup interferes with your heels, especially if you have large feet or use pannier bags.
Overestimating “Universal” Fits
Many products claim to be “universal,” but in 2026, bike frame shapes are weirder than ever. If you have an asymmetrical rear triangle or weirdly placed disc brake calipers, a “universal” guard might require some creative use of zip-ties or spacers. Don’t be afraid to modify the hardware, but don’t expect every fender to fit every bike perfectly out of the box.
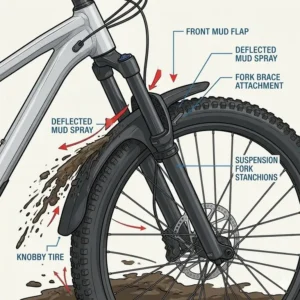
Skipping the Mud Flap
A fender without a mud flap is only half a fender. The flap is what stops the water from spraying the person behind you and protects your own shoes. If the model you like doesn’t have one, you can often buy an add-on flap or even make one from an old water bottle.
What to Expect: Real-World Performance vs. Marketing
The marketing photos always show a pristine bike on a slightly damp road. In reality, rear fenders have to deal with thick mud, salt, and road grime.
In 2026, we’ve seen a shift toward more aerodynamic designs. However, the “real-world” reality is that any full-coverage fender will add a tiny bit of aerodynamic drag. For the average commuter, this is negligible—maybe 1-2 watts at 20 mph. The trade-off is that you stay warmer. Wet clothes lead to evaporative cooling, which can make a 50°F ride feel like 35°F. By staying dry, you actually save energy because your body isn’t fighting to stay warm.
Also, expect some noise. Even the best-installed fenders can occasionally rattle when you hit a major bump. Regular maintenance (checking the bolt tightness once a month) is the only way to keep your ride silent.
Long-Term Cost & Maintenance of rear fenders
While the initial cost of rear fenders is relatively low (typically $25-$85), the “Total Cost of Ownership” includes the maintenance of the parts they protect.
-
Drivetrain Longevity: By keeping road salt and grit off your chain and derailleurs, fenders can easily double the life of your chain. In 2026, a high-end 12-speed chain can cost $60+. If fenders save you one chain replacement per year, they’ve already paid for themselves.
-
Cleaning Time: Think of fenders as a “time-saving” device. Instead of a 20-minute bike wash after every wet ride, you might only need a quick 2-minute wipe-down.
-
Replacement Cycles: Plastic fenders can become brittle after 4-5 years of UV exposure. Metal fenders can last a decade or more if you avoid crashing.
Features That Actually Matter (And Those That Don’t)
Marketing teams love to talk about “carbon fiber finishes” or “integrated LEDs.” Here is what actually matters when you’re 10 miles from home in a downpour.
-
Matters: Adjustable Stays. If the stays are a fixed length, you can’t center the fender over the tire. Avoid fixed-length stays at all costs.
-
Matters: Quick-Release Safety. As mentioned with the Planet Bike models, having a breakaway point is a vital safety feature.
-
Doesn’t Matter: Weight (within reason). Unless you are racing up a mountain, an extra 200g of fender weight is irrelevant compared to the 2kg of water weight your clothes would soak up without them.
-
Doesn’t Matter: Brand Matching. You don’t need Trek fenders for a Trek bike. Focus on the fit and the clearance.
✨ Don’t Miss These Exclusive Deals!
🔍 Take your cycling experience to the next level with these carefully selected rear fenders. Click on any highlighted item to check current pricing and availability. These tools will help you stay dry and keep your bike running smoothly through every season!
Conclusion
Investing in high-quality rear fenders is perhaps the single most effective upgrade you can make for year-round cycling comfort. By moving beyond the basic specs and looking at the commentary on mounting stability and material durability, you can choose a guard that fits your specific 2026 riding style. Whether it’s the permanent, rock-solid protection of the SKS Bluemels or the “just-in-case” utility of an Ass Saver, the goal remains the same: keeping the road where it belongs—under your tires, not on your back.
Remember to prioritize tire clearance and use a bit of threadlocker during installation to ensure a quiet, reliable ride. A dry cyclist is a happy cyclist, and with the right fender, there’s no such thing as “bad weather,” only different types of traction.
FAQs
❓ Do rear fenders slow you down?
✅ Not significantly. While they add a small amount of weight and wind resistance, the energy you save by staying dry and warm far outweighs the 1-2 watt loss. Most commuters find no measurable difference in their average speeds…
❓ Can I install a rear fender on a bike with disc brakes?
✅ Yes, but it requires specific hardware. Look for fenders with “disc-specific” stays that are curved to clear the brake caliper. Many 2026 models now include these spacers as standard to ensure compatibility…
❓ How much clearance do I need between the tire and fender?
✅ Aim for at least 10mm to 15mm. This prevents “clogging” if you pick up a small stone or thick mud. If the clearance is too tight, even a slightly out-of-true wheel will cause annoying rubbing sounds…
❓ Are clip-on fenders as good as full-length ones?
✅ For the rider, they are about 70-80% as effective. However, clip-ons rarely protect the bike’s drivetrain or the person riding behind you. They are best for occasional use rather than daily commuting in wet climates…
❓ Will a rear fender fit my 29er mountain bike?
✅ Yes, but you must buy a “wide” or “MTB-specific” model. Standard road fenders are too narrow and won’t have enough curvature to clear high-volume mountain bike tires. Look for widths of 60mm or more…
Recommended for You
- Mountain Bike MTB Mudguard: 7 Best Fenders for Muddy Trails (2026)
- 7 Best mtb bike fenders for 2026: Ultimate Trail Protection Guide
- 7 Best Gravel Bike Fenders for 2026: Expert Reviews & Buying Guide
Disclaimer: This article contains affiliate links. As an Amazon Associate, I earn from qualifying purchases. If you purchase products through these links, we may earn a small commission at no additional cost to you. All product research was conducted based on 2026 market availability and technical specifications.
✨ Found this helpful? Share it with your friends! 💬🤗
[addtoany]